Pros and cons of a nomadic apiary
Which apiary is better - stationary or mobile - each beekeeper decides for himself.
Let's look at the advantages and disadvantages of an apiary on wheels. Advantages of using a nomadic apiary:
- A nomadic apiary differs from a stationary apiary in its mobility (it is easy to assemble, disassemble, and transport).
- It is possible to get more honey than with stationary placement. The hives are transported to places with a large number of honey plants.
- There are more opportunities to get monofloral honey (from 1 type of plant) - linden, buckwheat, sweet clover.
- Another feature is the possibility of choosing environmentally friendly places.
Disadvantages of a nomadic apiary:
- Increased costs for the purchase and maintenance of transport (gasoline, repairs).
- The need to purchase additional equipment - drinking bowls, stands for hives.
- Uncomfortable accommodation in camping conditions;
- The complexity of loading and unloading hives, preparing the site for them.
- Wear and tear of hives due to frequent moves.
- The need for parking lot security.
Before investing money in honey production, you need to thoroughly study the question of how to organize an apiary from scratch for novice beekeepers in order to avoid common mistakes.
How to organize such an apiary?
All beekeepers who want to harvest a large harvest of honey products and increase profits from this type of activity think about the possibility of having a mobile, convenient apiary. As practice shows, it is an apiary on wheels that helps increase honey yield by almost 40% more than a stationary one. This is especially true in the spring. With its help, hives can be transported to large areas of honey plants. Moreover, the most valuable is honey that is collected from just one type of plant, and only a mobile bee apiary can help achieve this.
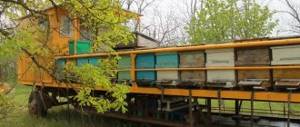
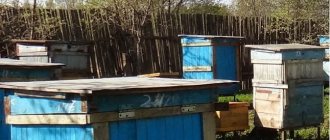
Hive in a trailer
Of course, it is difficult to replace a special bee pavilion, but still, a regular car trailer (as in the photo) can be useful for organizing migrations. A booth-type trailer will best cope with this task. If there is no such thing, and a regular onboard one is available, it’s also not a problem. In this case, you will have to build the hanging booth yourself. You will learn further how to do this thanks to simple instructions and educational video materials.
If you have a tent trailer, you can immediately start preparing the interior; if you have a regular trailer, then we’ll make a canopy. To do this, we make a frame using wooden slats, then you can build a “booth” with plywood or, again, wooden boards, and cover the roof with a steel sheet or other roofing material, for example, slate. Then the internal space needs to be divided into two parts according to the size of the hives and leave room for passage. For more capacity, it’s good to come up with a second tier.
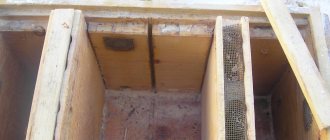
This is shown in detail in the photo.
Internal structure
Inside, the shelves and all fastenings for the hives need to be made strong and strong, because when moving from place to place, you need to be sure that the bee houses are well secured and do not wobble. You should also provide the necessary openings for insects to fly out onto the bribes. In the trailer, their size should match the size of the hive openings. If everything is ready, a suitable place for moving has been chosen, then you can safely install the evidence, secure it and transport it to the honey plants. The beauty of using such mobile apiaries is that the hives do not need to be constantly loaded and unloaded upon arrival. It is enough to place the trailer in the right place for the insects to start taking bribes.
Homemade platform
One of the most successful options for organizing a mobile apiary is a platform. You can purchase it ready-made or build it yourself, which is a very profitable and good option. A conventional platform, as we know, is a four- or two-wheeled platform with a special frame and mounts for hives. Usually they can be used to install bee houses in several tiers. Such platforms are attached to any car and are very convenient for transportation. But having some spare parts from a car or trailer on hand, it’s easy to make a platform yourself. For example, like in the photo.
To make it with his own hands, the craftsman needed levers with hinges, spring struts, shock absorbers, wheels from a car with independent suspension and steel parts for the base. A metal frame is installed along the required perimeter, to which a base with wheel axles is attached. Next, the only thing left to do is to attach wheels, shock absorbers, suspension and mounts for the hives. Such a platform is often called an apiary cart.
Pavilion for wandering
A beekeeping pavilion today is one of the most popular and affordable methods for organizing an apiary on wheels. They are simple covered and closed. Covered pavilions are essentially the same carts, only with a roof and fenced bars. Closed pavilions are already a solid structure that maintains a constant temperature in the hives, since they are of a closed type.
Ordinary pavilions have special openings opposite the entrances through which insects fly. Another type - a cassette pavilion is considered one huge hive on wheels. It has special retractable cassettes where bee families are placed.
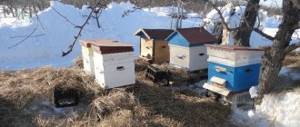
How to choose a place for a nomadic apiary
A dot is an apiary area that a beekeeper prepares for bees to live in.
For good growth and productivity of bee colonies, when choosing a location, focus on the following features:
- Place the points in close proximity to the honey plants. It is possible to place it in fields with crops (if there is an agreement with the owners of the crops). The bees will be able to make more flights and bring back more nectar and pollen.
- Think in advance about the route of movement of the apiary, depending on the time and order of flowering of fields with honey plants.
- Choose a place protected from winds, especially from the north and northeast. The area must be level.
- Do not locate the apiary along the flight path of honey bees from other farms. During bad weather (wind, rain), most of the bees may fly into other people's hives and not return home. Or other people's bees, with poor honey collection, can steal honey from your hives.
- The distance between nomadic apiaries should not be less than 1.5 km.
- It is advisable that there is a clean body of water near the chosen location.
An apiary is, first of all, a place where all work with bees is carried out. The condition of bee colonies and the success of the beekeeper depend on proper organization.
Hive in a trailer
A mobile apiary is primarily a bee pavilion, but such a design requires serious financial investments, therefore, we will try to find an alternative. A cheaper and no less effective option is a trailer booth. But, if you only have a flatbed trailer, then don't worry. The video below shows how you can make a hanging booth with your own hands.
Of course, the first option is the most convenient, because in this case you can immediately get to work on the interior decoration. Let's look at the situation when we only have a flatbed trailer. You can make a reliable frame from wooden slats, then fill the side walls with plywood or wide boards. The top of the structure must be covered with a steel sheet or slate to protect the hives from precipitation.
Now, with a calm soul, you should start internal work. First of all, we divide the internal space into two parts. We will place beehives on each side. There should be a passage in the middle. Some beekeepers, in order to increase the productivity of the apiary, install hives in two tiers.
It is important that the hives are securely fastened, because constant transportation can negatively affect the apiary. In addition, it is important to think through the holes intended for the workers to fly out.
If the house on wheels is ready, we place the hives in it and transport it to a field with honey plants. The beauty of a mobile apiary is that you don’t have to unload the hives every time, you just need to put the trailer in the right place and let the bees do their job.
Correct placement
It is better to choose a forest with deciduous trees for a mobile apiary. The place should be level, without stumps.
For correct placement:
- Mentally mark out the area for the apiary.
- Leave some of the hives on the trailer so that they can be easily accessed. Place the rest on the ground.
- Place the hives parallel to the bribe, at the same distance. It’s good if there is a gap of 4 m between the hives. You can arrange them in a checkerboard or square pattern. Arrangement in groups of 2-4 pieces is suitable. The entrances can be directed in any direction except north.
- Ensure that bee houses are located in the shade of trees during hot weather and warmed up by the sun in the morning.
- Provide apiary paths behind the hives so as not to interfere with the flight of bees.
- Don't forget about painting the hives. They should be different colors to make it easier for insects to navigate.
Placing hives in a nomadic apiary
Preparing bee colonies for migration.
The most common and easiest way is to transport bee colonies over short and medium distances (from 5-10 km to several hundred kilometers) by truck. Sometimes, on bad roads, tractor trailers are used for this purpose. Bee colonies should be prepared for transportation in advance so that the loading of the hives is not delayed when the truck arrives. This should be done especially carefully when there is a large number of brood and bees in the colonies, and during hot weather. Heavy honey frames with fresh honeycombs are removed from the hives. In the absence of permanent dividers, wooden blocks with a cross-section of 15X15mm and a length of 120-150mm are inserted between the frames. If the nesting compartment of the hive is completely occupied by bees, then to increase the volume, a magazine extension or an extra body (preferably with empty honeycombs) is placed on the hive. The top of the hive is covered with a metal mesh mounted in a wooden frame or with burlap. If the roofs of the hives are adapted to create an over-frame space and are equipped with a ventilation device, then you can do without installing an empty extension and metal mesh.
All parts of the hive are securely fastened to each other with special clamps or clamps so that they do not move during loading and transportation. In industrial apiaries, parts of the hives are secured with an iron tape, to the end of which is attached a closing device that tightens and secures the tape. Even better results are obtained by using rubberized belts used on conveyors (rejected belts are cut into strips 4-5 cm wide). Having wrapped such a ribbon around the hive, it is pulled together and secured with a special hook (Fig. 71). In a working day, a beekeeper with two assistants can fasten about 400 hives. At the end of the bees’ flight, all entrances are tightly closed with valves before loading. They should not be covered with a metal mesh, as the bees, trying to get out of the hive, get restless and clog the entrance, which causes unnecessary losses.
The hives are loaded onto the car with frames across the body in several rows and tied tightly with ropes. Depending on the volume of the hives, the tonnage of the vehicle and the size of the body, from 25-30 to 50-60 or more bee families can be loaded into the vehicle. The KAZ-717 semi-trailer can accommodate 96 multi-hull hives in four-seater containers (Fig. 39).
It is best to transport bees by car at night or early in the morning (close distance). In cool, cloudy weather, bee colonies can be transported during the daytime.
Having arrived at a new place and placing the hives, they open the entrances, thereby allowing the bees to fly around. If there are no landmarks here (individual trees, bushes), then bees may fly into other people's hives. Usually, some of the bees from the families in the back rows fly into the hives in the front rows. There are fewer flights if the hives in the new location are placed in the same order as they were before transportation, or the number of rows in the new parking lot is reduced. Labor costs for transportation can be significantly reduced if you use special devices for loading and unloading hives.
Bees are also transported over long distances by rail, air and water transport. By rail, bee colonies are transported in refrigerated and ice wagons (in hot weather), in cattle cars, ordinary freight cars and on open platforms (over relatively short distances). Bee colonies are prepared for transportation by rail in the same way as when transporting them by car. In the carriage, the hives are placed in frames parallel to the movement (along the carriage). Depending on the design of the hives, 75-100 bee colonies can be accommodated in a four-axle car.
*The results of mass experiments on the use of different methods of transporting bees from the Krasnodar and Stavropol territories to Siberia and the northern regions of the RSFSR indicate that it is not practical to transport bee colonies in hives over such a long distance. During long-term transportation, as a rule, exposed brood and a significant part of the bees die.*
Choosing transport for a nomadic apiary
The health and performance of bees depends on correctly selected transport. On the road, it is necessary to ensure the most comfortable conditions, without shocks.
How to transport bees correctly
Consider the specifics of transporting bees:
- A car, truck or bus is suitable for moving.
- Choose a route no more than 30 km. This will make the move easier for both you and the bees.
- Inspect the hives: they should be strong, light, with a flat roof (so that houses can be installed in several rows).
- The frames in the case must be secured so that they do not move during transportation. Bees should not be stressed.
- When transporting, make sure that the hives do not bump against each other and cause inconvenience to the bees. You can tie them with wire.
- Cover the bottom with hay, straw, and foam rubber to reduce shaking.
- Check the health of the bees. Weak families should not be taken on the road.
- Carry out loading in the evening, after the bees return to the hive, and transportation at night.
Watch a video about transporting bees
Preparation and transportation of hives
Under what conditions can bees be transported?
It is recommended to carry out transportation at night for a number of reasons:
- the bees are in a sleepy state;
- the temperature is lower, thereby reducing the risk of melting and falling honeycombs;
- lower noise and traffic on the road.
After transportation, the bees must inspect and get used to the new territory. Therefore, transportation should be carried out after they emerge from hibernation, or before they enter it.
Early spring or late autumn is best for this purpose. In winter, transporting bees is strictly not recommended.
Early spring is suitable for transportation because:
- there are not a large number of bees and brood in the hives;
- the frames are not filled with honey and have not gained weight;
- new cells have not yet been built.
The duration of transportation should not exceed two days. Bees can use the provided food within two days. After this they may die.
If transportation is carried out in the summer, or during the day, it is better to wait for cloudy or rainy weather. High temperatures can cause fatal harm to bees. Bees cannot be transported more than twice during the season.
When is the best time to transport bees?
The best time for transportation should coincide with the activity of insects, ideally this period is the beginning of spring and autumn months. If insects are moved in the first spring months, there is no need to specially prepare nests. The beekeeper should strengthen the frames so that they do not move when traffic moves. Classic hives are characterized by the presence of frames with special dividers - such products do not need to be strengthened, they are securely fastened from the beginning.
How to add a queen to bee colonies?
If the frames in the hives do not have such elements, they need to be strengthened using small bars with a cross-section. The length of each element should not exceed a third of the height of the frames. The elements should be strengthened with nails and inserted into each street. In the final spring months and summer, moving should be done by keeping insects on a certain number of honeycombs. Here it is necessary to use a special wooden board that would separate the honeycombs from the rest of the hive.
Transportation to honey collection is carried out at night. When preparing the hive, remove the outer frames on both sides to prevent insect injury. Instead of the removed elements, it is recommended to insert new frames with empty honeycombs into the hive. If bees are transported directly from the honey collection, store extensions to the surface of the hives should be removed.
Before transportation, all components of the hive should be carefully secured. When transporting in 20-frame hives, the top cover is secured to the surface of the front wall using a hanging hook. In a situation where transportation is carried out in extension-type hives, the elements should be carefully secured to each other.
You should remember that there is sufficient ventilation of the hive during transportation. It is recommended to use devices that are light in weight and will not harm insects or interfere with their movement. It is possible to make slits, which are subsequently covered with a metal mesh.
If transportation is carried out at elevated temperatures, which is especially important for southern regions, all elements that could lead to breakage should be removed from the hive. Among these elements are honeycombs, which have the largest mass, as well as gates and mats. When transporting, you should check the hive for holes through which insects can escape.
When to load the hive
Loading of hives begins in the evening, half an hour to an hour after the bees finish flying. Wooden boards are placed on the lower rows, the hives are placed, and then the second tier is installed. At night, it is possible to transport hives with open entrances. It is recommended to carry out transportation in nomadic pavilions.
Is there a need to remove the apiary annually?
Transporting bees is accompanied by a set of risks. It is recommended to organize nomadic beekeeping only if you are completely confident that it will pay off. The first year will make it clear how profitable this method of bee breeding is.
It is recommended to carry out a trial removal of bees in the spring in order to understand by the summer how profitable honey collection using this technology is. If it does not pay off, you can still have time to recover financial losses from mid-summer.
It is not always necessary to remove the entire apiary - only part of the hives can be removed periodically. There is also no need to travel for the entire season - only during the period when there are no honey plants nearby.
This question is individual for each beekeeper. If the apiary pays off, then it is worth removing it every year. If this is the first removal procedure, the owner of the apiary is advised to consider all the risks involved. The best time for export is the spring months.
Over the course of several months until mid-summer, the beekeeper will be able to evaluate all the efficiency and profitability or lack thereof. It is not necessary to remove the entire apiary, just a certain part of the hives is enough.
Characteristics of trailers Paseka-16 and Paseka-24
Trailers are designed for the needs of beekeepers with a mobile apiary. Manufacturer - Plant-firm Axis (Ukraine, Kirovograd region, Kropyvnytskyi).
Trailer Pasek-24
Technical characteristics of the Pasek-16 trailer:
- Consists of a platform measuring 4700x1800 mm.
- Has a twin torsion axle.
- Tire size 185/80R14.
- There is a hydraulic overrun brake.
- Load capacity 1800 kg.
- The number of loaded hives is 16.
Technical characteristics of the Pasek-24 trailer:
- Consists of a platform measuring 4800x2050 mm.
- Has a twin torsion axle.
- Equipped with a retractable cassette for 8 hives.
- Tire size 185/80R14.
- There is a hydraulic overrun brake.
- Load capacity 2000 kg.
- Loading height - 750 mm.
- Trailer weight - 700 kg.
- The number of loaded hives is 24 (12 frame).
Variety - Saddle apiary-24 with a load capacity of 1500 kg.
How to make a do-it-yourself apiary trailer for 10 hives
A trailer for a passenger car can be made from a regular trailer by extending the sides. For reliability, it is advisable to add a second axis. The manufacturing process consists of 2 operations: it is necessary to assemble the frame and make the platform.
Trailer device
The basis is a two-axle car trailer. On top of it there is a platform with sides. Attached to the vehicle with a horizontal lever (drawbar).
Drawing and step-by-step assembly diagram
Step-by-step instruction:
- Decide on the size of the future trailer based on the size of your hives. Please note that the dimensions of the trailer should not interfere with traffic on the highway. Consider the vehicle's power and whether it can handle the load.
- Draw a diagram according to your needs. Use the example diagram (see below).
- Stock up on the necessary consumables: profiles, pipes, boards.
- Remove the sides from a regular car trailer (you can use an old one). Extend the platform using a welded pipe structure.
- To strengthen the structure, also use pipes.
- Weld the sides. Cover the floor with metal sheets or boards.
- Treat metal parts from rust and paint with metal paint.
Watch a video about how you can make a trailer from a regular car
Trailer assembly diagram
How to make a trailer for a nomadic apiary with your own hands for 20 hives
The trailer is designed for installing hives in 2 rows with a passage between them for caring for bees. Manufacturing requires a welding machine and welding skills.
Device
The trailer consists of a frame, sides, a wooden floor, a drawbar with a towbar, 2 axles with springs, 4 wheels. It is carried out by welding metal parts and mechanical assembly.
Drawing and step-by-step assembly diagram
- Weld the sidewalls from metal pipes 5 m long with a rectangular section of 60*40 mm. For a more durable structure, weld reinforcements from a pipe with a cross-section of 20*30 mm to the sidewalls.
- Place the sides parallel to each other at a distance of 1.2 m.
- Place transverse pipes 1.8 m long on top of them, with a profile of 60 * 40 mm. There will be a pipe protrusion of 30 cm on each side. Each pipe should be placed at a distance of 55 cm. Weld the pipes.
- Install beams made of thick-walled pipes on the body.
- Attach the springs to the beams and install the wheels.
- Turn the structure over. Weld the drawbar and attach the towbar to it.
- Weld the sides in the form of frames without facing.
- Treat all metal parts from rust. Paint with metal paint. Let it dry.
- Attach the floor boards to furniture screws. Pre-paint the boards on the underside.
- Check the trailer while driving without any hives.
Watch a video about how you can make a trailer with your own hands
Trailer diagram
Nuances of nomadic beekeeping
It is imperative that when organizing a nomadic apiary, the beekeeper’s resting place must be thought out. It could be a van, a collapsible cabin or a tent.
Basic technologies in modern beekeeping
This place should be as comfortable as possible for the beekeeper. In most cases, car trailers are used for nomadic bee huts.
Specifically trailers, because if the bee housing is located directly in the car, this creates certain difficulties in case of engine failure.
For a bee pavilion, it is convenient to use hives of the same size, located in several tiers, on both sides of the trailer. One trailer can accommodate up to 80 families.
When creating a bee house project, you should pay special attention to the illumination of the apiary. Most often these are windows that are located on the roof of the pavilion. The roof must be made of durable, waterproof material.
When organizing a nomadic apiary, the beekeeper’s resting place must be thought out.
If a mobile bee pavilion uses standard hives, then caring for bees is not much different from caring for a stationary bee pavilion.
One of the main factors of a nomadic apiary is the safety of transporting bees.
For this:
- it is necessary to check the condition of the car;
- the dimensions of the pavilion should not exceed the standards established by law;
- Additional signal lights are installed in the apiary;
- the pavilion must have reflective stripes, etc.
Note! A source of water should be provided near the apiary, to which the bees could easily reach.
Making a canopy for a nomadic apiary with your own hands
A canopy is necessary for pumping out honey and working with hives. Sometimes it is used to shelter from rain, protect bees from the scorching sun, and separate a control hive. A canopy can be built over a trailer in which insects are transported. To do this, metal racks are made in the corners and along the sides, arcs are attached to them, and then polycarbonate sheets are attached. You can replace it with dermantine. Sometimes they use old tents. Another option is to drive in stakes and stretch a tarpaulin. Ideally, a ready-made pavilion is used.
An original canopy made from scrap materials
Feature of a nomadic apiary with beehives and beds
Bed hives have a horizontal structure. Available with 10, 12, 15, 20, 25 frames. They are more often used in stationary beekeeping, but those who like to roam with their apiary for honey collection also use this design.
Advantages of beehives:
- Convenient for transportation, more stable, cannot tip over.
- They have a simple design, a wide comfortable entrance.
- They have a flat roof. Compactly located in transport.
- The mass of the bee colony quickly increases in them.
- The amount of honey is 2 times higher than in other hives.
- They make it easier to prevent swarming.
- Convenient for two people to carry.
Advice! To make it easier to carry, it is better to use lightweight materials for beehives, such as plywood.
Watch a video about the design features of beehives
This is what a beehive bed looks like
Disadvantages of keeping bees with changing locations
Despite all the above advantages, in setting up a house on wheels for your bees, it is worth identifying some of the disadvantages of running your farm using this method.
Main disadvantages:
- Huge costs, including financial ones, for organizing the transportation of bees. In addition, the process of caring for an apiary in such conditions is quite inconvenient.
- The need to constantly have with you all the required tools and materials for successful care of the hives (repairs, etc.). In addition, the beekeeper will have to live in the field without any city amenities. Often such a place becomes a hastily built house, but the possibility of living in a tent is not excluded.
- It is necessary to be well oriented in the surrounding space, to know well the places where various plants grow, and also to take into account the time of their flowering.
- The beekeeper’s responsibilities begin to include not only caring for the hives and monitoring their condition, but also protecting the entire apiary from unwanted visitors.
- Often, in order to visit any attractive place for bees with your apiary, you must have certain documents for permission to use it for the location of bee houses. The beekeeper needs to take care of the relevant documentation in advance, i.e. in winter.
Equipment for a nomadic apiary
Apiary inventory is conventionally divided into 3 types:
Equipment for examining bee colonies:
- A steel chisel with a curved end - used as a lever to hook the frame; the reverse, pointed side is used to clean frames and bee houses;
- Smoker - consists of a cylindrical body, closed with a lid, and bellows (the role of a blower for coals). The body of the device contains a glass with holes in the bottom. It is designed to burn “fuel”.
Important! The “fuel” used is tinder fungi, rotten chips of alder, birch, willow, and those materials that emit a lot of smoke when burned.
Dried lemon balm and mint are used as a sedative for bees.
- Brush for sweeping bees from frames, for cleaning in the spring. Must be soft so as not to cause injury to insects;
- Carrying frames - a plywood box with a lid and handles for easy carrying. Holds 8-10 frames. Can be used for short-term placement of insects - layering, removing a swarm. Additionally, a tap hole and a mesh cover are provided.
- Blowtorch or gas spray - used to disinfect hives before placing bee families in them.
- Hanger-holder - for hanging frames when examining a family (for 2-4 pieces).
- Metal gripper acts as a pliers when removing frames.
- Canvas is a piece of cotton or linen fabric. They cover the frames in the nest.
Uterine care equipment:
- Cap - used to insert a breeding uterus into the family, to isolate the uterus when changing an old one to a young one. Consists of a tin rim (diameter 90, 120 mm), mesh and fastenings.
- Titov's cage is a box with a mesh, 2 holes - entrance and for food. Used for isolating the queen in the nest, transporting it, adding it to a new family, for protection.
- The separating grid is a plate made of tinplate or plastic measuring 446×235 mm, has oblong holes arranged in rows. Using the grid, nests are demarcated for isolating the insulator and removing the uterus.
Equipment for working with frames:
- Awl - holes are made in the side slats of the frames to tension the wire.
- A special pattern - for sewing frames with a comb, roller or electric sewer.
- Round nose pliers - for threading wire into holes in the frame.
- Roller with a spur - for cold rolling. Consists of a roller and a toothed disc.
Equipment for pumping out honey:
- Sieve for straining honey (hole diameter 1-3 mm).
- Knife with a wide flat double-sided blade - for printing honeycombs. Water heating, a steam knife or an electric knife are used.
Inventory is necessary not only during the active life of bee colonies, but also during autumn work in the apiary and preparation for wintering.
Watch a video about the necessary equipment for an apiary
Hatching of the uterus in a nomadic apiary
Queens can live 5 or more years. Usually the queen is kept in the apiary for no more than 2 years, then replaced. The exception is breeding individuals. Many beekeepers have their own method of removing the queen. Meet one of them.
To breed young queens, observe the following conditions:
- use warm weather, if available;
- hives must be insulated;
- for queen rearing, take newly hatched larvae from productive colonies;
- for raising, choose a strong family predisposed to swarming;
- use the best period for brood - mid-May;
- There must be sufficient supplies of food, printed and open brood.
Instructions for removing the uterus:
- Place a frame with bowls (they can be purchased at a specialty store) for bees to polish in the selected hive for 2-3 days.
- Find the queen and breed, orphaning the family.
- Place the honey frame with the queen and bees in the layer.
- Add 2 more frames with printed brood to the layering.
- In the hive where the queen was, place a frame with beebread on the edge.
- From the next 2 frames with eggs, honey and beebread, shake the bees back into the hive and put them in another place.
- Instead, put a couple of frames, then a grafting frame. Next, install 3 more frames with printed brood. The nest will turn out to be “squeezed.” Separate the installed frames with a wooden or foam board. Cover the top with film. Over time, the bees from the brood will return to their hive.
- After 5-6 hours, inoculate each bowl with larvae (they look like a crescent) from the frame. Carefully remove with a spatula along with the royal jelly and transfer to a bowl.
- Place the grafting frame in the starter nursery. The bees will feed and warm the larvae. Place a bag of honey feed.
- Cover the frames with a warmer cloth. Check after 2 days. Feed periodically.
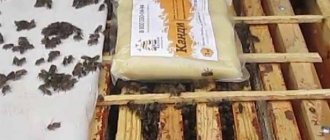
- On the 10th day, put protective caps on the queen cells so that one emerging queen does not destroy the queen cells. Place some Kandy food in the caps.
- After 2 days, mark the emerging queens. After 5 days the queens will emerge.
In good weather conditions, a barren (just born) queen flies out of the hive already on the 3rd day, leaves the house, making an introductory flight. On days 5-7 it mates with drones. After another 2-4 days, egg laying begins. This uterus is called the “fetal” uterus. The timing depends on how strong the family is. This is one of many ways to increase your apiary.
Queen bee surrounded by bees
What does the migration of bees affect?
- Since in the southern regions all crops bloom several weeks earlier than in the northern ones, transporting hives from one region to another (in the meridional direction) allows you to extend the period of honey collection from plants of the same species. The same applies to moving the apiary from the foot of the mountains closer to their peaks, or transporting it from the southern side of the ridge to its northern slopes.
- Moving hives over relatively short distances, for example from an acacia planting to a buckwheat field, makes it possible to obtain several collections of pure-grade, and therefore especially valuable, honey of different types in one season.
- Migrating allows you to avoid competition between bees, which arises if there are five to seven neighbors nearby your apiary.
- In search of nectar, bees can move 5-6 km away from their home, but they do this only if absolutely necessary. The usual flight range of “winged workers” is 2, maximum 3 km. Therefore, if within a radius of these very three kilometers around the apiary all the nectar-bearing plants have already faded (have not yet bloomed, died from bad weather or disease), the bees that go “for prey” every day return to the hives without a bribe. During such graceless periods, insects become very vicious, sting anyone, swarm, steal supplies from neighboring bee colonies, or even completely rob and kill them. Transporting the hives to another, “blooming” place, allows the bees to be busy with work and at the same time solves all the above problems.
Do-it-yourself hive technology
How to set up a nomadic apiary
Having decided to use a traveling apiary, study the list of documents permitting this type of activity. It is mandatory to fill out a veterinary and sanitary passport for an apiary. This document gives permission to carry out any actions - transportation of hives, sale of honey, queen bees, purchase of families, etc.
Seven sections include information about the owner of the apiary, its description, location, characteristics of families, number of hives, sanitary condition and health of insects, a list of preventive measures, results of laboratory tests of bees, honey, beebread, etc.
You can obtain the document at the regional veterinary station. The farm is first inspected by a veterinarian, takes samples for analysis, and gives an opinion on compliance with sanitary standards and rules. If there are no complaints, a passport with a doctor’s signature and stamp is issued.
Every beekeeper should know exactly how to obtain an apiary passport and what activities should be carried out on his farm before the inspection.
Before departure, you must complete one of the sanitary documents presented below:
- Veterinary certificate (form No. 1) - required for transporting bees outside the area of residence to any place in Russia. It is drawn up in a veterinary institution subordinate to the executive authorities of a constituent entity of the Russian Federation, signed by the head or doctor who has the authority to do so, and certified by a seal.
- Veterinary certificate (form No. 4) - required for transporting bees within the area of residence. It is drawn up in a veterinary institution subordinate to the executive authorities of a constituent entity of the Russian Federation, signed by a doctor, and certified with a seal.
- Veterinary certificate (form No. 6.1).
If a mobile apiary is planned in the forest, then you should know Article 38 of the Forest Code. According to this document, apiaries can be located in forest lands on the basis of lease agreements with institutions on whose territory the forest is located.
The regions of the Russian Federation have their own laws that you need to know and follow.
In addition, you must have a permit to drive a vehicle with a trailer and open the appropriate categories. The trailer must be provided with license plates, traffic police documents, and the permissible weight without load is 750 kg.
Even more requirements are imposed on documentation and activities if the apiary is used as a business.
Take note
Before you decide to use a nomadic apiary, study the relevant information and draw the right conclusion for yourself. Remember:
- Before starting a nomadic life with bees, put all documents in order for the apiary and transportation of bee families.
- Inspect the beehives and check the availability of the necessary equipment.
- Assess the physical condition of the bees and queen bee.
- Take care of transport. Choose the best trailer option depending on the number of hives. For example, the Paseka-24 trailer, whose twin torsion bar axle can withstand heavy loads.
Combine business with pleasure - enjoy clean air and get even more high-quality honey.
Instructions for creating a platform
Some craftsmen decide to save money and create a platform for beehives themselves. It's not difficult, it's important to follow a few rules:
- Initially, make a wooden frame according to the internal dimensions of the trailer or platform.
- Be sure to carefully measure the dimensions of the hives and the body. After all, they should line up with the smallest gaps and be securely attached.
- Consider the fastenings for each hive separately and connecting them to each other.
- If you install hives on top of each other, then the second tier should be secured more securely - with self-tapping screws and metal corners.
- It is advisable to install a canopy over the structure to protect the hive from precipitation in case of bad weather.
- If you leave enough space between the rows of hives, you can easily move between them, inspecting them during a trip or honey collection.
- Provide adequate ventilation for them, especially if you do not intend to constantly unload the trailer, but rather keep the hives on a platform.
It is also important for the beekeeper to create suitable living conditions. It can be a transport van, or even a tourist tent. It all depends on your desires and needs.
Video: nomadic beekeeping.
Inventory
Not a single experienced beekeeper will go on a long journey with his charges without taking with him all the necessary tools and bee equipment. And this:
- Various tools for repair work - hammers, screws, etc. Everything you use in the apiary and at home.
- Some tools for mobile repair of your vehicle.
- You must always have your phone, money and documents with you.
- It is also important to make sure that the bees have enough of everything - foundation, honeycomb frames, additional magazines and other beekeeping equipment. Don't forget the smoker and enough fuel for it.
- If there are no shops nearby, then make sure to have sufficient supplies of provisions, water and other things that you may need while away from home.
Only by thinking through your migration to the smallest detail can you make the trip without any difficulties. For the first time, it is advisable to migrate close to home for a short period. It’s even better if you can hire someone who already has some experience in this matter as an assistant.
Transportation of hives is carried out using:
- nomadic mesh (provides ventilation in the hives, so the bees do not get tired);
- clamp for fastening hives;
- mesh slings (provides external fastening and can be used to create a canopy);
- nomadic booth;
- beams for connecting hives.
When transporting, it is recommended to use a nomadic booth. It is required for living and staying during periods of adverse weather conditions.
To install and maintain an apiary, you need a set of equipment consisting of:
- main and spare smoker;
- spray bottle;
- carpentry tools;
- empty hives;
- roevni;
- scales in a casing;
- lantern
Depending on the period for which you plan to live near the apiary, household items may be required.