Characteristic
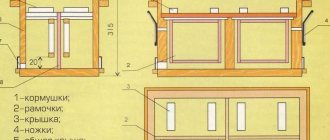
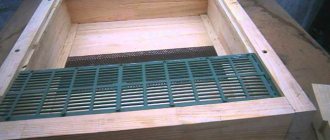
The body of the structure looks like a box with a partition in the middle, which has the same appearance as the base of a honeycomb in bees. The outside of the box measures 117 m2. The partition has slots with a diameter of 0.4 mm every two cells of the honeycomb. The total number of such slots is 90 pieces, into which 90 plastic plugs with curved ends should be inserted on one side. They just play the role of the bottoms of the cells.
When each of the slots is filled, the back side of the box is closed with a polyethylene lid, and on the other side a plastic grid is placed, which is the bottom part of the honeycomb cells. Instructions for use are provided for each honeycomb.
Making honeycomb
Genter honeycomb can be made with your own hands using specific charts and instructions. To manufacture the device, you will need the appropriate components, namely:
- mounting screws;
- covers that are useful for isolating the uterus;
- double-sided plastic box;
- plastic grids in the shape of cells;
- a special design where there will be plastic conical cups necessary for forming bowls;
- plastic pipes that will be required to secure the bowl to the grafting frame.
The main purpose of the Genter honeycomb is to hatch queen bees. It should be noted that it has its own peculiarity of functioning. It should be accompanied by specific instructions that can explain how to use it.
The box acts as a honeycomb body and has a central partition. The surface resembles a honeycomb. Before manufacturing, it is necessary to take into account the size, namely 117 x 117. The shape must be square. The Genter honeycomb contains partitions with 4 mm holes. The total number of holes can reach 90 pieces. When they are filled, the box is covered with polyethylene to form a bottom for the honeycomb.
We recommend reading: When can you drink milk after a cow calving: after how long, how to milk a cow correctly
Design and operation of jenter honeycombs
Varieties
Genter honeycomb comes in a number of varieties. Its basic design is the “Standard” model. There are also the following varieties, which differ only in configuration:
- "Fast start". This set is as convenient as possible, as it provides special bowl holders on the grafting bar. The kit includes uterine cells and a device for removing the cups.
- "Advanced Standard". Additionally included are bottoms with bowls (115 pieces in total), grafting strips, and a plug for cleaning the cells. Uterine cells (30 pieces) are provided. The difference lies in the size of the case. It has the shape of a square, but with a side of 12 cm.
Gender cells are regularly upgraded, the kits are replenished with additional devices. The kits come with a DVD containing video instructions.
German beekeeper Karl Genter came up with a simple way to breed a queen bee. He made the jenter honeycomb. Removing queens is a difficult job; it requires experience, and you also need good eyesight, which a beekeeper does not always have. When the larvae are transferred, they are damaged in large numbers, because of this they cease to fully develop.
Making jenter honeycomb with your own hands
Having realized all the advantages of jenter honeycomb, both young and more experienced beekeepers still decide to work independently. But indeed, to develop a good beekeeping business, you need two Jenter honeycombs at once, and the price for many is very often prohibitive. Below is a good, high-quality and budget-friendly DIY honeycomb option.
Each element of the jenter honeycomb can be replaced with improvised things, and, most importantly, inexpensive ones. For example, the honeycomb body itself can be replaced with either a plywood box or another small rigid box, bowls can be made from the tops of a syringe, etc.
To make a device with your own hands, you will need the following equipment:
- Double-sided plastic box.
- Covers are needed to isolate the uterus.
- Plastic gratings, which have a cell shape, represent the beginning of a honeycomb.
- A special design that contains a large number of conical cups made of plastic, so bowls will be formed.
- Plastic pipes so that you can fix the bowls to the grafting type frame.
- Mounting screws.
In the photo you can see the configuration of the jenter honeycomb.
The Gender type of honeycomb has its own method of operation, so it always comes with instructions on how to use it correctly.
The box, which has a central partition, is a jenter honeycomb body; its surface resembles a honeycomb. It is important to consider the dimensions - 117 by 117, it has a square shape. Genter honeycomb has special partitions with a 4 mm hole; there can be up to 90 of them. The bottoms of the cells are formed by plastic plugs that have concave ends. When the hole is filled, the plastic box needs to be covered with a polyethylene lid; it will serve as the bottom for the honeycomb.
Specifics and equipment for pumping honey
Technology for working with denier honeycombs
- After you have assembled the jenter honeycomb, you need to cut it into the frame; two screws are used for this.
- The frame and the comb should be placed in the middle of the nest with brood.
- The bees will coat the honeycombs with wax and then clean and prepare the cells.
- After 24 hours, you need to remove the frame to the side where it is open, close it with an insulating device, then remove the plug that was in the center.
- In the family, the beekeeper finds the head of the family, transplants it into artificial honeycombs, and closes it tightly on top.
- The frame is placed back into the hive where the bee family is located.
- There should be a small hole in the lid, which serves as an insulator, this is an exit for the workers.
- The queen, which is separated from the others, begins to lay eggs in the jenter's comb, then can completely fill the cells. If the strong head of the family spends three hours filling it out, then you need to remove the frame and remove the lid. Then return the frame.
- It is taken into account that the head of the family can use the Genter type of honeycomb for a long time, then suddenly leaves it.
- When the beekeeper has completed all the necessary actions, he closes the hive.
After 4 days you can check the bee colony; it should be feeding the larvae that were placed in the comb. This way you can find out detailed information when you need to move a cell. If everything is done correctly, the beekeeper will be able to navigate the age of the larvae. Once the frame is removed, the busy bees are brushed off. The frame needs to be moved to where it is warm. There you can get acquainted with the larvae in detail and find out how they develop.
Reproduction of queens using Jenter's honeycombs
Genter's system is quite complex, but reliable. If everything is done correctly, the result will certainly be positive.
Genter honeycomb is a square box (117x117) with a partition in the center. In total, the box contains up to 90 partitions with a 4 mm hole. The bottom of the cells is formed due to the presence of plastic plugs with concave ends. Once the hole is filled, the beekeeper covers the box with Jenter's honeycombs with polyethylene.
After all the necessary preparations, the grafting frames must be installed in the new bee colony, where the rearing will take place. It is important to take into account the capabilities of the families - two frames are enough for one bee colony, that is, 40 future queens. The bee colony will ensure the completion of the queen cells, giving them the necessary shape, feeding and rearing, and supplying them with beebread.
The instructions for the generator cell contain a special diagram for starting the process correctly. All actions are scheduled in time, which allows you to plan the entire process and achieve its maximum efficiency. In total, this takes 30 days. The main time limits are as follows:
- the queen should remain in the prepared structure for at least 3 hours, it is recommended to wait 15-20 hours so that eggs are guaranteed to be laid;
- It is recommended to check the laying of eggs the next day at 9-11 o’clock; if the attempt was unsuccessful, then it must be repeated;
- The larvae are placed into the host family after 3 days;
- after another 3 days, begin preparing the nuclei and bee colony to replace the queen;
- after 8 days, transplant the queen cells into the cores, provide the insects with 2 weeks of rest;
- after a period of rest, check the honeycombs - if there are fertilized cells, then the new queen is ready to replenish the family.
When placing larvae in a breeding family, it is necessary to have a reserve. Larvae may be rejected, so their feeding and development must be monitored. In case of rejection, it is necessary to replace the larvae with a reserve and strengthen control.
By making a jenter comb or a nicot comb yourself to hatch queens, you get rid of its most important disadvantage - the price.
Also, many beekeepers claim that honeycomb made independently gives much better results than purchased ones. Since honeycomb made from natural materials, which has not been subject to any chemical treatment, attracts queen bees better.
How does the queen hatch?
How is the queen hatched day by day? The uterus is placed in an isolator for 1 day.
On the second day, you need to release it and make sure that it has seeded all the uterine bottoms. The grafting frame is returned to the hive.
The family for the future queen is also prepared in advance. The queen is removed from the bee nest so that the bee family feels orphaned and accepts the larvae for upbringing. After 3 days, the laid eggs turn into larvae.
We recommend reading: General rules for growing greens
On day 5, the cassette is removed from the apiary and bowls and cups are placed on each plug with larvae. They are attached to frames and lowered into a bee's nest, where family caregivers are waiting for them. Thus, on the fifth day, having made sure that the family has accepted the larvae, they leave them alone until the 16th day.
On this day, based on the insect development calendar, the queen should emerge within 24 hours. Therefore, in advance, it is necessary to put protective cages-curlers on the queen cells, with the help of which it is easy to meet emerging young individuals. These devices can be immediately transferred to ready-made bee colonies that do not have a queen bee. During industrial breeding, the queen can be removed from the nest again, and a mature queen cell can be given to the family instead. Thus, several queens can be raised in one season.
What is the service life of a Genter Cell? Since the device is made of plastic, it can be used endlessly for many years. After finishing the process of raising bees, the device must be cleaned for further use.
How to clean a Genter cell? The algorithm of actions is as follows:
- It can be poured with sugar syrup and lowered into the hive. After a few hours the bees will clean it and it will be ready for use.
- The manufacturer recommends treating cups, bowls and all small parts using a match for hard-to-reach places.
- Then you should wash all the parts in hot water and wipe with any disinfectant solution so that no parts of the old cocoons remain in them.
Design Features
The Genter honeycomb is made of plastic. The set consists of a cassette, a set of cells (shaped like “curlers”), bases for the grafting frame and holders of the uterine bowl, as well as bottoms and the bowls themselves. The kit includes a tool for removing bowls from the cassette and a separate device for cleaning them. Some models have grafting strips.
In turn, the cassette consists of a honeycomb mesh, which is a copy of natural bee honeycomb. The honeycomb mesh is coated with a thin layer of wax, which ensures that the device is accepted by bees.
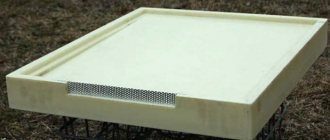
The cassette is double-sided. The front side is closed with a dividing grid, acting as a uterine insulator, and bottoms and bowls are inserted on the back side. The dividing grid has a cover for the passage of the uterus.
What the original Genter honeycomb for breeding queens consists of is described in the video below:
Installation of bowls
After hatching the larvae, the jenter comb must be carefully removed from the frame and transferred to a warm room. In the room in which further work will be carried out, you should put a couple of pots of water to boil to increase the air humidity. This is necessary so that the larvae do not dry out during transfer to the grafting bar. The actual procedure for installing the bowls is as follows:
- the bottom with the larva is removed from the grid cell in the body;
- a bowl is put on it;
- holders are attached to the grafting bar;
- A bowl with a bottom and a larva is inserted into them.
Thus, you need to place the required number of bowls on the holders. Next, the strips are installed in the grafting frame.
How to work with jenter honeycombs
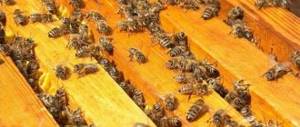
- Having collected Jenter's honeycombs, you need to place them in the center of the nest with brood.
- The bees will almost immediately cover everything with wax, clean and prepare.
- After this, remove the frame with the open side, close it with a special insulating device and remove the plug from the center.
- The beekeeper inspects the colony, finds the queen and closes it in artificial denter combs, after which he places the frame back in the hive.
- The lid, which is also an insulator, should have a small exit for the bees.
- The isolated queen begins to work on creating offspring. As a rule, in strong families this process takes place within three hours, after which the frame can be removed, the cover removed and put back.
Arranging queen cells by bees
After 3-4 days the family is checked again. At this time, the bees should already be working on feeding the larvae from the jenter's honeycombs. Inspections should be done regularly to understand when to move the cells. When the time has come, the worker bees are removed from the frame and the frame itself is transferred to a warm place to study the development of the larvae.
Thanks to the use of jenter honeycombs, the family accepts all larvae
Once the insulating cover has been opened, it is necessary to carefully select plugs with a large number of larvae. Then they take a plastic cup, which they put on the plug to create a bowl. To hatch a queen in gentry combs, you should:
- collect bowls with larvae and insert them into plastic tubes to fix the queen cells;
- in the grafting type, drill a hole of about 18 mm;
- place up to 10 queen cells on the slats.
You can add up to 2 more frames to a strong family. Thanks to the use of jenter honeycombs, the family accepts all larvae. The bees then build queen cells of special shapes. Thanks to this method, full-fledged insects of quite large sizes develop (average weight about 210 mg).
Work technology
When the honeycomb is collected, it is inserted into the hive, cutting into one of the frames. Secure it with screws. A day before the required collection of larvae, this frame is placed between two existing frames with brood. The bees immediately begin to modify the plastic base: they apply a layer of wax to it, preparing cells for future offspring. After one day, the frame is removed from the nest.
Having taken out Jenter's honeycombs, you need to cover the area prepared by the bees with a plastic lid. In the middle of the lid there is a round hole closed with a stopper. Through it we will launch the queen bee inside. It is necessary to find a young productive queen in the nest and send her to an artificial comb. After which we immediately close the central passage, preventing the uterus from getting out.
Now the isolated queen is simply forced to lay larvae in cells prepared for this. She will also gradually fill the plugs of the plastic box with eggs. Nurse bees can easily enter the honeycombs thanks to the narrow slots in the lid. But the uterus cannot get out through such holes.
Jenter honeycomb is convenient because you can accurately determine the age of the larva. The bees begin feeding the brood after about 3 days. At this time, the frame with the artificial honeycomb is taken out of the hive and, opening the box from the back, the contents of the cells are examined. In the video you can take a closer look at how to work with Genter's cell.
Hatching and rearing queens
To ensure 100% hatching of queens, it is necessary to select healthy and age-appropriate larvae. However, there should be no more than 20 such individuals per frame. Having selected cells with larvae suitable for hatching queens, each plug is closed with a cup to form the shape of a queen cell.
Round holes measuring 1.8 cm are made in the grafting frame. Now you need to insert queen cell plugs into these holes. This is done using clamps. After all the preparations, the jenter honeycomb is placed in a strong bee colony, which will feed and raise the larvae, as well as supply the queen with beebread. Also, worker bees will complete the queen cells, giving them the correct shape.
But it is worth considering that even a strong nurturing family can only accept 40 queens, that is, more than two frames are not placed in a nest. Experience shows that Jenter's honeycomb allows the bee colony to accept all the larvae without any problems. Queen cells produce good queens that can ensure normal egg laying.
Treatment with bees: features of apitherapy and its benefits
Explication of honeycomb or jenter
Experienced beekeepers, as well as authors of specialized literature, compare Jenter's honeycombs in importance with a regular hive. Only the device itself is distinguished by its movable frames . The structure of the jenter honeycomb is quite diverse. Honeycomb represents:
- double-sided plastic box;
- plastic cover (to isolate the utricle);
- plastic grill;
- a special design of hundreds of plastic cups (to form bowls);
- a plug with bottoms for these bowls;
- plastic pipe for fixing these bowls.
Also, the purchased Gender Cell comes with instructions with a detailed description of the cell structure and how to work with it.
Why should you choose Genter honeycomb?
- Almost complete intake of larvae.
- It is not necessary to disturb the larvae during their transfer to the queen cell. And the jenter cell guarantees your safety.
- Thanks to the very regular and large shapes of the queen cells, quite large queens are obtained.
- Bees are pacifistic towards new queen bees.
- Guaranteed brood expansion for queen bees.
- The Genter comb makes it possible to determine the age of each larva in the comb.
- The main advantage is ease of care and operation (the honeycombs are very easy to use, and they do not cause any unnecessary trouble. You just need to spray them evenly with syrup and you can send them to your family, and after a few hours you can safely repeat the procedure).
Making a nicot system with your own hands
Such a device makes it possible to hatch queens and not transfer larvae. Many beekeepers breed queens with larvae, which are transferred, then carefully taken and inoculated into homemade wax bowls. This method is quite difficult; it requires the beekeeper’s good vision, excellent coordination of movements, knowledge, and skills.
You can try to construct a nicot system with your own hands; to do this, you need to take care of cassettes that will represent the honeycombs with a large number of bowls, equip and close it with a grid for separation; use a plexiglass lid on the reverse side.
In a standard kit you can breed up to 30 queens, which is enough for a small apiary. In cases where there are few of them, the beekeeper purchases additional bases, cages, and holders for bases.
- The reverse side of the cassette must be equipped with a lid, there must be a hole in it, a plug. The front side must be equipped with a grid for separation, and do not forget about the hole for inserting the queen.
- The main thing is to install the cassettes correctly on the frame; they can be used with wax, dried, in some situations an empty frame is suitable, it needs to be nailed to the top of the block.
- Cell sections must be cut to match the dimensions of the cassettes; correct fixation is important in this situation. Leave a special hole at the top of the cassettes.
- After preparing the grafting queen, you will need one, it can be used for a long time. Different frames are used as a grafting frame; it’s okay if there are defects on them.
- It’s not difficult to make a frame with your own hands; to do this, the bottom block is fixed in the center, and the plinths are nailed to the top. Bases and bowl holders are installed in the required quantity.
- The grafting frame should not have a bottom bar. Bowl holders are installed on plinths. They must be placed perpendicularly so that they can be removed.
Basic rules of use
- Cassettes are installed on the frame.
- Grafting types of frames are manufactured.
- The bees must clean and polish the cassettes.
- Place the uterus in the cassettes.
- Form a family that will raise the head of the family.
- Check how the bees accepted the larvae.
- Get rid of low-quality queen cells.
- Select mature queen cells, the best queens.
- Check how the queen was accepted and whether she is laying eggs.
Installing honeycombs into a nicot system for purification
If you have not used the system for a long time, you will need to clean and polish the cassettes. The dividing grid is first removed. Nicot, which contains bowls, a sufficient number of honeycombs, needs to be smeared with honey, set up a family for polishing. A frame of honeycombs is installed in a nest with brood for one day, or more, in order to:
- The bees cleaned and polished the cells.
- The insects got used to the new object that appeared in their nest.
- The honeycombs have been warmed up properly, the temperature should be the same as in a bee’s nest.
Rules for transplanting the uterus into a nicot cassette
When the insects have completely cleared the nicot, you need to take the queen and place it in the cassette. Some people take it with their hands, but it is best to use a nicot cell so as not to harm the uterus. To do this, she is kept in the family and driven into a cage. Then you need to put it in the open hole. The plug closes.
Design and functionality of apilift
The bee stays here for 24 hours to check egg laying. When the honeycomb is blackened, the insect is released, the frame is placed in a place where the eggs can fully ripen and wait until the larvae appear. The hatching of the queen must correspond to the apiary work calendar.
The presented system is one of the best options for hatching queens, which does not require transfer by larva. Special cells are used. It’s easy to carry out all the actions in the apiary using this device; even a novice beekeeper can handle it. You can make such a design yourself or purchase a ready-made set that is reliable and of high quality.
- What is a “honeycomb”.
- Bee hives
- Hatching queens without larvae
Advantages and disadvantages of use
1. The larvae are not damaged or dry out during transfer, since the transfer is carried out without touching them.
2. Larvae for transfer are taken of a strictly known age (the youngest).
3. Using a spatula, the larva is transferred to food that is unusual for its age, which significantly worsens the quality of the resulting queens. Typically, queen cells are grafted onto jelly taken from older queen cells. Since it is almost impossible to collect milk from larvae under 12 hours of age, there is too little of it. In the jenter comb the larva is transferred along with the bottom of the cell and all its jelly.
4. A big advantage for queen breeders is the friendly emergence of queens. Such an amicable exit does not happen when hatching with the transfer of larvae with a spatula, and even more so when the fistulous and swarming queens are emerging. When the emergence of queens lasts for several days, working with queen cells is very difficult. For example, individual queens may already be emerging, while others in the same family may be on the 10-13th day of development, when they need complete rest. The slightest shaking at this time can lead to the death of the queen cells. Some queen breeders claim that even a thunderstorm these days causes their death.
5. Great convenience for elderly and inexperienced breeders, which is not necessary to have excellent eyesight and a steady hand when using a brood comb. As you can see, the honeycomb can be built into a frame with drying, but you can not build it in, but simply attach it to a separate upper bar of the nesting frame, this will make it easier to work during further maintenance. This does not affect the sowing of the honeycomb by the queen.
The popularity of Jenter honeycomb is due to a number of its advantages:
- acceptance of larvae is almost 100%;
- convenient transplantation of larvae in large quantities with minimal losses;
- accurate determination of the age of larvae;
- correct shape of queen cells and large size - ensures large queens;
- the loyalty of bees to the queen bred in this way;
- it is possible to organize the simultaneous exit of queens from the honeycomb;
- ease of operation - this method is well suited for beginners in beekeeping and people with poor eyesight;
- ease of care;
- reusable.
Features of the design of a do-it-yourself omshanik
Cons of Nicot honeycomb or Genter honeycomb
- High price for the product.
- Does not allow the production of a large number of queens, since there are only 99 bottoms, many of which cannot be seeded.
- Large-scale production often requires two Genter cells.
Having outlined above the most important disadvantages of Jenter honeycombs , you can pay attention to the high price. Unfortunately, the price is the main and biggest drawback that novice beekeepers pay attention to. Fortunately, this is a fixable problem. Gender honeycomb is very easy to make on your own, as it does not require any special education. Of course, as with any homemade device, you need to put in some effort.
1. The high cost of jenter honeycomb, approximately $130 depending on the configuration.
2. It is not suitable for producing a large number of queens, since there are only 99 weaning bottoms. Not all of them are sown with a queen. Usually one seeding is enough to charge two grafting frames, approximately 60 larvae. For further work, you need to have spare bottoms in order to re-equip the honeycomb for the next sowing. The bottoms are released only after 17 days. Therefore, in large queen-breeding apiaries it is necessary to have several genter combs.
3. The work of hatching queens using a brood comb should be started 4 days earlier than when transferring the larvae with a spatula. Therefore, it is more difficult to predict what the weather will be like during the vaccination period. And when the queen hatching cycle began, all work was carried out strictly according to schedule, regardless of the weather.
4. With some doubts I would like to point out one more drawback, which I am not entirely sure about. In some colonies, bees change queens after enclosing them in a gentry comb. I had two such cases. I have been breeding queens this way for 6 years now. I use two combs and have kept breeding queens in them many times. These two cases could be neglected, but given the special value of queens used for breeding, I consider it necessary to warn beekeepers about this possibility. Perhaps the bees of some families believe that such a queen (limited in laying eggs in a small area of the comb) does not lay eggs well due to illness or other disadvantage, and therefore she is replaced.
I often give out mother liquors wrapped in chocolate foil. It protects the sides of the queen cell from being chewed by bees, and the free top of the queen cell does not interfere with the exit of the young queen.
In conclusion, I will provide information that may be useful if you yourself buy jenter honeycomb abroad. In Russian-speaking countries, its not entirely correct name is used - jenter sot. In fact, the first and last name of the inventor is Karl Jenter. The translator read Jenter as it is pronounced in English, not German. However, in Poland, the jenter honeycomb is called the Frame of Amber, and in Ukraine, most often, it is called Enter’s Scraper, although there, of course, the name jenter honeycomb is also used.
Facts about honeycomb Nicot
1. The queen lays two types of eggs - unfertilized and fertilized.
2. Drones emerge from unfertilized eggs on the 24th day.
3. From fertilized eggs, depending on the composition of the food with which the bees are fed, the eggs and larvae produce either worker bees (on the 21st day) or queen bees (on the 16th day).
As the egg develops, it tilts to one side and on the third day lies at the bottom of the cell (bowl). A few hours before hatching, the nurse bee larvae place the first significant portion of milk next to the egg, which is 3-4 times the weight of the egg.
During the first days, bees feed all larvae equally with royal jelly. But by the end of the third day of life, the bee larvae begin to feed the larvae of worker bees and drones with a mixture of beebread and honey, if the bee colony develops normally.
If a queen has been lost in the family, or one of the impulses has arisen, then the bees begin to feed some of the eggs (larvae) only with royal jelly in order to ensure the appearance of new queens in the family. Under natural conditions, bees raise, as a rule, 2-6 queens and then the first queen to emerge from the queen cell (often with the help of bees) destroys the rest.
4. Although bees accept significantly fewer eggs than larvae for queen rearing, in recent years (I have not yet found 7-year-old accurate data) scientists have proven by weighing queens and analyzing their egg production that queens that have never received food containing protein components turn out better than those who, for some reason, managed to receive such food.
Do-it-yourself electric drive manufacturing technology for a honey extractor
This is where the recommendation in the Nicot system came from, to transfer bowls with eggs that are no more than 24 hours old, in order to IN ADVANCE eliminate the chance of at least one incorrect feeding of future queens. For example, due to bad weather, which will make it difficult or even impossible to carry out the transfer of larvae in time.
5. If one-day-old eggs get into a de-matted colony, then the bees at an earlier stage, realizing the need to hatch new queens, begin to rebuild the queen cells. And such queen cells turn out to be somewhat larger than queen cells that were obtained from late-stage eggs or larvae (you just need to remember point No. 7 of the instructions - see below).
It is easy to calculate that when you transfer even a one-day-old larva, you deprive the bees of the opportunity to begin rebuilding the queen cell three days earlier. And three days out of a total of 16 days is almost 19 percent. Against the background of the short period of development of the queen cell, this percentage is much higher.
Lattice Nicot
Manufacturer and cost
The manufacturer of Jenter honeycomb is Karl Jenter (Germany). The cost of the device depends on its model:
- “Standard” costs approximately 6,100 rubles;
- “Extended standard” costs an average of 7,000 rubles;
- the cost of “Quick Start” is about 5,700 rubles.
Not only these varieties of Jenter honeycomb are available for sale in a set, but also its parts separately. Any element of the kit can be purchased additionally. This allows you to expand the set if necessary or replace failed parts.