Significant benefits of sun loungers
To appreciate all the benefits of keeping bees in bees, they are often compared with three-hull hives, which are so popular in modern beekeeping:
- Large capacity for bee families and honey reserves.
- At the same time, it is lighter and easier to transport from place to place than a conventional three-body one.
- It is possible to make layering, thereby expanding the bee colony, strengthening it and making the apiary larger.
- It has been calculated that in such a hive-bed the bees manage to store more honey during the season than in other structures.
- It's easy to add frames without touching the main family.
- The beekeeper's work is made easier due to the fact that such hives can be inspected much less often, forcing them to be framed in front.
- In beekeeping, this design is especially appreciated because it is easy to clean in the spring or at other times of the year, without completely pulling out all the frames, but only slightly moving them.
- The simplicity of the design gives you the opportunity to quickly inspect all the frames without even removing them completely from the hive. In contrast, multi-body hives need to be completely disassembled in order to inspect all the frames, the nucleus, add or remove something, and also for cleaning.
- Due to the large space, you can quickly get new brood.
- Such structures are very easy to transport from place to place. They can be stacked on top of each other, which also saves space in transport.
- In such hives, bees can be in working order all year round, and the bee colony remains strong at all times.
- A more comfortable wintering for bees occurs due to the fact that two families with two queens can be placed in a hive-bed at once and they will warm each other throughout the cold period.
- It is also easy to insulate such a hive for the winter, since there is a lot of space left for pillows and other insulation.
This is interesting The drug Apifit for treating bees
Benefits and Features
As noted above, the greatest advantage of a lounger is the ability to work with it without lifting weights. The beekeeper will only remove individual frames with honey, place them in a carrying box and deliver them to the pumping site. In this work, everyone is guided by the capabilities of their own body - you can remove a larger number of hundred frames or get by with 3-4 pieces.
Some beekeepers prefer to move honeycombs individually, so as not to further injure the bees. This is a completely justified practice for a small amateur apiary.
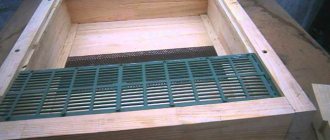
The second plus is the design. When finished, the bee house is an elongated box with a lid that can be hinged or removed completely and temporarily placed on a nearby hive or work table.
The most effective way to keep bees is in hives with 20 frames. Along with them, 24-frame designs are also popular. Such houses have sufficient volume, which allows colonies to develop well in the spring and produce a lot of honey in the summer. Of course, according to the specified parameters, the bed is noticeably inferior to multi-body hives, but at the same time it wins in comparison with 12-frame magazines.
The third plus is the ability to support two families under one roof. This feature of the house is widely used in the winter and spring. After the reduction of the main nest, a nucleus or a small layer is placed behind the partition. Alternatively, two bee colonies of approximately equal strength can sit in both compartments at once.
How to keep bees in multi-hull bee houses
It is also practiced to divide the bed into several sections to contain cores. To do this, additional entrances are cut into the hive opposite each small compartment.
What are the benefits of keeping two families under one roof? After the exhibition from the winter hut, the nests begin to develop and are expanded by the beekeeper. Then one of the families can be transplanted into a separate house or used to strengthen the second, main bee colony (with the replacement of the queen, for example, if we are talking about last year’s layering).
That is, this is done for the convenience and rational use of the part of the house that is usually empty in winter. After the nests are reduced, there is a “reserve” void in each nest, which is used for growing layering or maintaining cores.
Some disadvantages
And yet, such convenient and comfortable hives may also have some disadvantages, which must be taken into account in order for beekeeping with them to be successful.
- Despite their lightweight design, they still take up more space than a multi-body hive.
- Due to the smaller space under the frame, the bees may not have enough air cushion. For wintering this creates some problems.
- If you need to install an additional extension, there will be nowhere to put it here. Therefore, with a large bribe, you will have to collect honey a little earlier.
- It has been noticed that when bees are bred in bees, their tendency to swarm increases, regardless of the breed. But it’s easy to deal with this too, knowing how and what to do.
Rules for working with sunbeds
In order for work with bees in beehives to be successful, you need to follow simple rules:
- For wintering, nests should be well insulated. This is especially true when you leave them under the snow.
- It is important to provide your pets with enough honey and bee bread.
- During active egg laying, light brown comb should be added to the nest in sufficient quantity.
- It is very important to prevent bees from swarming in time by carrying out anti-swarming techniques.
- Add frames with foundation in time.
- To increase honey reserves, it is advisable to carry out the so-called regrouping. To do this, the printed brood is removed deep into the structure, and the queen and open brood are left at the entrance itself. A sufficient number of frames are laid between them.
- For the winter, you can combine two families in one hive-bed for a more comfortable winter. The most important thing in this case is to put a tight frame between them, so that the families do not unite into one by spring. All it takes is a small gap and you will be left with one colony with one queen.
- In July, old “queens” are replaced with young ones.
- In August they are engaged in raising a family for future wintering.
- For the winter, two families need to leave at least 20 kg of honey reserves. For two families, 12 frames are enough.
Preventing swarming
Since swarming in beehives is more likely and more difficult to monitor, you should learn how to prevent this phenomenon. The Chaikin method is most often used:
- As soon as you notice that there are already 10 frames with brood in one hive, you should separate the “queen”.
- The hive is divided into two parts by a tight frame. The uterus and 8 frames are moved into the smaller one. The entrance is left open.
- For the most part, they leave all the bees and 12 filled frames (with honey, brood, beebread). Their entrance is closed.
- At the same time, working individuals actively rebuild honeycombs. And the queen in another part of the hive is also actively laying eggs.
- The bees do not swarm, as they are busy with construction work, but at the same time they are constantly in contact with the queen.
- Completion of the process is a regrouping in two weeks.
This is interesting Features of the development and nutrition of honey bee larvae
You can also make layering. This is especially important when the swarming process can disrupt the late honey harvest.
- The hive is also divided into two compartments by a partition.
- 1 – 2 frames with brood and a few working individuals are placed in the smaller compartment. Place honey and bee bread around the edges and add water. A mature printed queen cell is also installed here.
- In the larger compartment we leave the old uterus.
- After fertilization of the layering, another 2 to 3 frames of brood should be added. Instead, we put foundation in the first compartment.
- As the layer grows, we replace the brood and foundation several more times.
In this way, they not only prevent swarming, but also increase the strength of the colony for the main honey collection. This method is often used when there are two short honey harvest seasons, or one late one.
Content technology
Beehives today have become very popular in use, both by novice beekeepers and by professionals whose experience is worthy of respect. First of all, they are easy to use and have a number of advantages. For example, it is easy to form layering in them, which allows you to quickly grow families, and also in these hives, insects remain in working condition throughout the entire breeding season . But in order to realize all these benefits, you should know some features. Thus, keeping insects in hives requires certain knowledge and skills from the beekeeper. We'll talk about them now.
Techniques for working with bees
The main task of the beekeeper is to provide insects with food. For the winter, the nest needs to be well insulated. As soon as the queen begins intensive egg laying, you will need to add frames with light brown honeycomb to the nest. During the warm honey harvest season, they are filled with wax, and in the spring they are placed between a hundred honey-beebread and a preparation with brood. Then, with the onset of heat, they move to the center. To avoid swarming, bees need to be kept busy with construction work. To do this, it is best to install two frames with foundation while removing the ones already built. They should be stored until the main bribe.
Regrouping of frames before the main honey collection
This technology in the beehive helps to obtain frames with a large amount of honey, which means it helps to stock up on a good food supply for the winter. If this is not done on time, then after the bribe it may turn out that there will be no reserves suitable for feeding in the winter. In order to avoid this, frames are grouped. Near the entrance they should be concentrated with open brood and the queen; with printed brood they should be removed deeper into the hive. In this case, this must be done before the main honey collection.
Installation of extensions
If the conditions for keeping bees are favorable, then before the main honey collection, when all the nests are already occupied by honeycombs, you can install an extension with 10 or more half-frames and built-up honeycombs. This will help avoid swarming. If this process has begun and the bees have laid queen cells, then there is no need to install a superstructure.
Socket expansion
As you know, expanding nests, as well as inspecting families, always takes a lot of time from the beekeeper. Especially in large apiaries, people do not always have time to expand the nests in time or place frames with foundation, which leads to the onset of a swarming state of bees. That is why in beehives, such a concept as a one-time expansion allows you to maintain the working capacity of workers and increase their energy. This technology allows you to get rid of the need to perform a number of complex works.
Formation of a temporary layer with a young queen
This process is very important in cases where the main honey harvest is late, for example, from buckwheat. In such cases, it will be extremely difficult to prevent swarming in beehives. At this time, there are already many young individuals in the workers’ house who are waiting for work. As a result, these bees begin to swarm and lay queen cells. To maintain efficiency during late honey harvests, part of the young brood should be taken and layering should be formed. In addition, this helps to increase a large number of families to the main bribe and maintain their working capacity.
When to start forming layering?
A temporary layer should be formed when the main family occupies 11-12 frames in the hive-bed, and 8-10 of them will contain brood. It is very important to have time to form layers before the bees begin to swarm. To do this, it should be divided into two compartments using a dense partition. We remember that this is the main feature of these houses for working women, because they have two entrances. We give the larger section to the main family, and plant the offspring in the smaller section.
How to treat a bee sting
How to form layering?
Layers should be formed in the morning, and in the evening the bees should be given a mature printed queen cell taken from the main colony, or a young queen should be planted. For layering, we place one or two frames with printed brood along with the adults. We remember that the old uterus should remain in a larger compartment. You need to place honey and beebread combs along the edges of the frames, and you also need to pour a little water into one of them. This needs to be done, because at first the flying bees will fly away to their original place in the main section and there will be no one to bring water to.
Once the queen has fertilized the layer, two or three frames of mature printed brood should be placed. Instead, we place it with wax in the main section. As the layer increases, it will be necessary to regularly substitute frames with brood, thereby further promoting its accumulation.
Advantages of layering with a young queen
If you make layering with a young queen in time and regularly pick up frames with printed brood in the main section, this will not only prevent the hive from overflowing with young bees and their swarming, but will also help to obtain a large number of good flying workers for the summer honey harvest. There will be an old and a young queen in two compartments. Before starting the bribe, we attach the layering to the main family, removing the blind partition. If necessary, we move this partition to the other edge of the hive and form a nucleus with the old queen. This helps increase the number of insects for the late autumn honey harvest. At the end of autumn we unite the nucleus with the family.
Formation of layering with an old queen
This option is especially suitable for those areas where spring is short and the main but short honey flow begins quickly. Also, an old queen with layering is used where there are two short honey collections. This method also helps to quickly build up the bees to the bribe, prevent swarming and increase their efficiency.
How to form layering?
In this case, the hive bed is also divided into two compartments by a partition. Approximately 7-10 days before the start of honey collection, you need to separate the layering from the main colony, taking away two frames with printed brood on which the queen and adult bees are located. Honey and beebread frames should be placed on both sides of the part for layering. The next day after the formation of the layer, we will see that, left without a “priestess,” the insects will immediately build new queen cells. They need to be removed and this will be repeated every 8 days. After this, the mature queen cell is placed in the main colony. At this time, the layering grows and increases in size.
To avoid a swarming state here too, it is important to constantly place new frames with foundation in this part of the hive, and take the brood into the main hive. Due to this constant brood obtained from the layering, the large family becomes stronger and makes good use of the early honey flow. You need to combine insects from two compartments before the main bribe.
Wintering
Since the wintering of bees in beds occurs a little differently than in conventional structures, we will dwell on this point in more detail:
- After the main bribe, an audit should be carried out and the presence of fertile queens, the strength of families, the amount of honey reserves, etc. should be determined.
- For strong families, 8-10 frames are left for the winter, for medium-sized ones - 6-7, and for weak ones, 4-5 are enough.
- Orient the installation of the frames to the tap holes. If he is alone, then the middle of the frames is installed near him. If there are two, then place the frames evenly between them. In the case where there are four tapholes, then the frames are shifted to some edge.
- They limit excess space, maximizing the insulation of the hive. To do this, you can force it with polystyrene foam. Don't worry if there is a little space between it and the edge. This helps better ventilation without disrupting the warm regime.
- Don't forget to provide extra ventilation. For example, you can fold the back of the canvas at the top or leave gaps in the ceiling boards.
- At the same time, the ceiling boards are also insulated. But it is better to do this with “breathable” materials, for example, straw pillows.
- Install protective bars against rodents and other pests.
- When cold weather sets in, the hives are brought into the omshanik or additionally insulated and protected from birds and wind, leaving them outside.
- Remember that bees should not be disturbed by any noise in winter. This makes them nervous and may diarrhea.
- It is enough to come once a month and carefully clean the entrances from death. After all, if they become clogged, the bees will not have enough air and they may die.
- Keep an eye on the spring when bees actively begin to feed. If there is no honey on the frame, then the bees may not move to another frame, dying from hunger. Therefore, they should be fed additionally.
- You can lay bars on top of the nest and place a honey frame on them. This provides an additional supply of food when the bees eat everything from the main frames.
- Bees make a cleansing flight when stable warmth sets in. But there is no need to rush with the revision. It should be done only two or even three weeks after the first flight.
This is interesting Feeding bees in winter: when and how to do it correctly
Video: beekeeping in beehives.
DIY design
Buying a beehive is not a problem today. It can be ordered or purchased at any beekeeping store. In addition, such hives can be ordered by a person who knows how to work with wood. It’s even more economical to make the design yourself. You don't need much for this:
- Schemes for standard frame sizes in such a hive are already given in sufficient quantities. They are not difficult to find. If you are going to make a design with a non-standard number of frames or want to use frames of a different size, then you should create a drawing yourself.
- Having made all the measurements, they make blanks from wooden planks and boards. It is important that the wood is dry, strong and even.
- Have enough screws, brackets and fasteners for assembly.
- The created blanks according to the drawings are carefully and tightly assembled into a structure.
- It is advisable to cover the lid with a galvanized sheet, and also attach handles, curtains, landing boards and other small items.
- Don't forget to paint the hive. To do this, they are coated with drying oil and painted on top.
- If you install the hive-beds on any elevation, then make sure that the stand stands firmly and is not very high.
Drawing of a hive-bed with 24 frames and step-by-step work order
The most common option today remains a frame bed for 24 standard frames with a magazine for 24 half-frames.
The design features of the beehive can be seen in the photo:
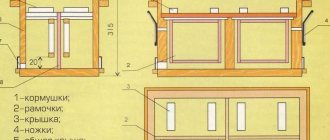
Frontal and side sectional view
In the presented drawing: 1 – block of the bottom shield; 2 – bottom; 3 – side walls of the body; 4 – front and rear walls of the housing; 5 – front and rear walls of the magazine attachment; 6 – side walls of the store; 7 and 8 – roof trim bars; 9 – rear wall of the roof; 10 – front wall of the roof; 11 – side walls of the roof; 12 – roof; 13 and 14 – entrances.
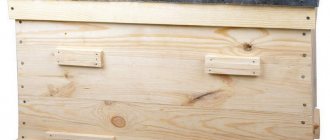
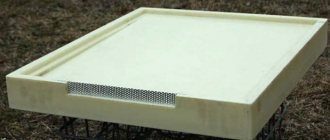
General front view with tapholes:
The upper tapholes are round (25 mm in diameter), the lower ones are in the form of slots (180x10 mm)
To get a clear idea of the simplicity of the design, just watch the following video:
Having prepared all the necessary tools, materials and having a general understanding of the design, you can proceed to assembly.
Step one: construction of the hive bottom shield
Cut and prepare two bars for the bottom:
It is better to use bars from harder wood
Sew together four boards (38x140x935 mm) in a quarter, having first removed the side chamfers from them according to the proposed drawing:
Before fastening the boards with self-tapping screws, it is necessary to glue the joining surfaces with PVA glue
After this, stepping back 50 mm from the edges, tightly attach two bars to the shield on which the sunbed will rest.
Step two: collecting the side walls
According to the drawing, two side walls of the hive should be assembled:
The boards are connected according to the same scheme as when assembling the underbody panel
Step three: assembling the front and back walls of the case
Carry out the assembly in the same way as the previous operations. In the upper longitudinal part of both panels, a 19x19 chamfer should be removed for the frames and ceiling boards. Cut four tap holes in the front wall:
The distance between the centers of the tapholes should be 245 mm
Step Four: Assembling the Case
It is necessary to tightly connect the side, front and rear walls of the housing to the bottom. Cut ceiling boards (up to 10 mm thick).
Step Five: Assembling the Store
To assemble the magazine attachment, you will need front and back walls. In the upper longitudinal part of the boards, you need to chamfer 19x10 for the hangers of the half-frames; in the transverse part, select quarters to connect to the side walls:
In this case, no splices need to be made. For the walls you will need two boards 38x145x977 mm
Connect the walls of the housing into a quarter using PVA and self-tapping screws.
For each side wall you will need one board 38x145x488 mm
Step six: arranging the roof
To arrange a roof that fits “overlapping” onto the body of a hive or store, you will need strapping bars. The harness is attached to the side (A) and end (B) walls of the roof:
The purpose of the strapping bars is to serve as a support for the roof
The end walls of the roof, as a rule, differ in width: the rear is narrower, the front is wider. This is done so that the roof has a slope:
The roof can have various designs. In order to reduce the weight of the lid, it can be made lower and flat
If the roof is pitched, it is necessary to make a 35-degree cut in the side walls on which the shield will lie. You also need to think carefully about the ventilation system - make several slots measuring 5x140 mm.
Drawing of the side walls of a pitched roof
After this, it is necessary to connect the side and end parts. All that remains is to make a roof shield (1140x660x22 mm) - join 22x140x1140 boards into a quarter, and then fasten the shield and the roof body.
The roof can be covered with linoleum, roofing felt, galvanized iron or other moisture-proof material
Step seven: flight boards
It is necessary to build landing boards under the entrances:
The drawing shows only approximate data: how to make flight boards, what their size and shape will be - each beekeeper decides for himself
Step Eight: Final
At the final stage, you should equip the bee house with strong handles (two at each end), dry the hive, paint it outside with oil paint, and equip it with frames and a diaphragm. Design features and details may vary. For example, some beekeepers make two diaphragm partitions, install hinges and equip a folding roof that does not need to be raised, in addition, it also serves as a barrier from the wind.
The so-called “Vladimir lounger” with a gable roof on hinges and six entrances