Beekeeping is constantly undergoing updates and the introduction of new technologies, improved products and designs that are designed to make the process easier. One of these new products was the horned hive. Its inventor and active advocate was Mikhail Palivoda. He recommends it in cases where the apiary is aimed at industrial honey production. But, before choosing just such a design for your farm, you need to understand its advantages and disadvantages, design features and the specifics of keeping bees.
What are the benefits
The Palivoda hive (also called the horned structure of an insect house) has the following advantages:
- You can install various types of frames in it, both purchased in a store and made with your own hands for a Dadanovsky hive.
- You can make a horned hive with your own hands. The simplicity of the design allows this to be done even by those who have no experience in carpentry.
- As the main material, you can use lining with a thickness of no less than 25 mm and sufficiently well dried. These conditions help prevent the spread of fungal infections within the hive.
- If there are no planed boards or linings, any wood scraps will do. The structure can be assembled at minimal cost.
- To implement it yourself, you don’t have to acquire a special tool.
- The standard Palyvoda horned hive holds 8 frames of a standardized size. Their dimensions are 435 mm and 145 mm. Can be used in nucleus type hives.
- The cost of production is low, so it is affordable for beginning beekeepers.
- Weight including frames does not exceed 16 kg. as a result, such a house can easily be moved by one person without much effort, which makes work in the apiary easier.
How to make a horned beehive
If you have chosen this option for a bee house to install on the territory of your apiary farm, it is not at all necessary to purchase it in stores. It is quite possible to make it yourself.
First of all, this becomes possible thanks to the most simple design underlying this bee dwelling. For this we can thank its inventor Mikhail Palivoda.
By the way, why is the hive called horned? In appearance, there are no characteristic protrusions on its body that could cause such associations.
The secret of this riddle is also quite simple. This hive received its name not because of the peculiarities of the appearance of its body, but due to the special method of fastening its individual elements together.
The design is also convenient in that you can choose for yourself the optimal dimensions of both individual elements and the product as a whole. It all depends on your desire and on the requirements that the bees kept on the territory of your apiary can make for their home.
The traditional version of such a house for the winged workers of your beekeeping farm consists of the following parts:
- bottom;
- second bottom;
- main body;
- fixing frame.
As a rule, this version of a bee’s home is made of wood, but no one is stopping you from experimenting with other materials that seem more convenient to you.
Blanks for making a home for the winged apiary workers can be found at the sawmill. You can also look for them yourself in other places: here everything is completely in your hands, and any options can be useful.
Remember that you do not need to buy special solid and large pieces of wood. The production of such a house is completely waste-free: any scraps, even the smallest ones, can be used.
This fact largely explains why the production of this type of bee house is the most budget option. At the same time, many beekeepers like its use: both beginners and quite experienced ones.
Leave a five-millimeter gap between the body bars. A chisel will be installed in it to process the main parts of the bee house and bring it to mind.
In addition, it will act as a lever. When you click on it, the parts of the house will move in the direction you want.
Equipment
The house includes:
- The body itself is like a frame element to which all other parts are attached.
- The bottom bottom is made solid.
- The second bottom, which has a mesh through which debris falls through and does not accumulate directly in the hive. This allows you to keep the insect house clean.
- A plane that acts as a roof. It is made of galvanized steel and matches the dimensions of the main body. To ensure reliable temperature conditions, foam is used as insulation.
- Frames with a size of 145 mm.
Horned hives. Cases.
The material that I was thinking of using on the horned hives dries very slowly. Even though it lies near the stove, in a warm place, with bars between the layers, it is of little use. Moisture comes out of some boards as mold, some crack excessively. And time is already running out, I had plans to make horned bodies.
Well, I collected what I had from the remains of dry boards and glued together a dozen blanks for the walls of the buildings. In case of gluing, I bought a cutter for a “micro-spike” connection earlier:
After processing with a milling cutter, the surfaces have this relief:
I applied PVA glue to them and glued them together using a clamp. The clamp remains from the times when I glued Rutov’s cases.
After drying and jointing, the connecting seam is almost invisible neither in the cut nor along the plane.
If the fibers also have the same direction, you won’t be able to tell where it’s glued together. And the strength is decent, I tested it for fracture - sometimes it breaks along the fibers, and not along the gluing.
I glued it together, but a dozen blanks won’t solve the problem. And then chance helped us find dry material. I was wandering along the shore of our lake, and I saw a willow tree covered with an axe. It's been there for a long time, several years, that's for sure. Not a trace of the bark remained; half of the tree was sawed off for firewood for picnics. The cut is homogeneous, the wood has not been alive for a long time, but is not rotten either, this is called sieve wood. And it lies so beautifully - only the bottom of the trunk is on the ground, and the rest is raised, blown from all sides.
Anyway, the next day I came back with a chainsaw, a car and a trailer. I sawed the trunk into pieces. The material turned out to be what we needed - dry, soft, light. You can freely load one and a half meter logs yourself. Only at the very bottom there was a little moisture inside - it was pulled from the ground. I took everything, let it sit and dry.
In the village, I sawed the logs into logs of the required length, lightly processed them with a chainsaw and a jointer. This is what happened:
Using a circular saw, I cut boards 165 mm wide in two passes - with permission for processing. The material is simply wonderful, it’s easy to work with, you can pick it up and you can’t hear the weight.
I decided to make the walls of my horned hives 22 mm thick. Why? Because the standard thickness of the shawl is 25 mm. And shalevka is the most accessible and cheapest material. We process it on a jointer, we get 22 mm. For a hive with a wall, say 25 mm, you need to buy a board of thirty. This is much more expensive and weighs more.
Well, on the jointer I reduced the thickness of the workpieces to 22 mm. You can’t achieve high precision with hand planing, I just tried to make it no thicker than 22 mm. 21.5 – acceptable.
And he sharpened one edge - at a right angle to the plane.
On the untreated side, I cut the width to 153 mm - this is the height of the hive body. The cut edge was not processed further.
Using a miter table, I trimmed and cut the pieces to length.
Side wall – 535 mm (frame width without shoulders – 435 mm, plus the distance to the hive wall 8x2=16 mm, plus the hive walls 22x2=44 mm, plus external projections 20x2=40 mm). Front (rear wall) – 389 mm (10 frames 37 mm wide = 370 mm, plus a gap of 5 mm, plus tenons along the edges 7x2 = 14 mm).
In the blanks of the front and back walls, I used a milling cutter to make a cut for hangers 8x11 mm. The thickness of the top bar of the frame is 8 mm.
Along the edges of the same blanks, I mill 7x10 mm tenons, which will fit into the grooves of the side walls.
This assembly will provide the body with strength and correct geometry. I think it is enough to make the tenon length 5 mm.
I mill grooves in the side walls, also 7x10 mm. I did it in two passes (3.5 and 7 mm) so as not to load the router.
By the way, in the middle of the process, my “Fiolent” broke down - the rear bearing flew apart. I urgently had to go to the city, buy and install a new one.
The tapholes were drilled with an ordinary feather drill with a diameter of 25 mm.
Assembly. Here it is important to ensure a flat plane of the table - so that there is no “propeller”. I have two chipboard table tops screwed together with self-tapping screws.
I used a mallet to avoid making dents in the soft willow. Everything is simple here - the tenon is placed in the groove. Then I slightly leveled it flat. And screwed it together with 45 mm screws.
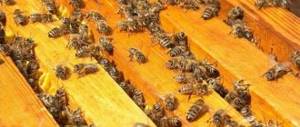
The frames become as expected - with gaps between the walls and the space under the frame of 8 mm.
The top bar of the frames is flush with the edge of the hive wall. Next time I will make a 9x11mm sample to recess the block by 1mm. Why didn’t I do the opposite - the top bar of the frame was recessed by 8 mm, and the bottom one was flush with the wall? Well, for example, we need to find the queen in the apiary. We remove the body, put it, say, on a flat lid, and bees sit on the lower bars of the frame. If there is no space under the frames, the bees are crushed.
I assembled several buildings, placed them on top of each other, and checked whether the gaps between them were large. And there are almost no gaps. The maximum is half a millimeter.
Next is the final touch, giving the horned bodies “horns.” They will keep the housings from moving. I cut the bars with a section of 25x18 mm.
I decided that “horns” with a height of 15 mm are quite normal, no higher is needed. To automatically set this height, when assembling, I placed a block of 18 mm thick. The length of the bars for the horns is 150 mm. 150+18=168. 168-153 (case height) = 15 mm. The length of the bars for the “horns” is 3 mm less than the height of the body, so that there is a gap of 3 mm between the horns of the upper and lower bodies. It is convenient to insert a chisel into it and separate the cases glued with propolis.
The finished housings are put on each other with light effort. I think they’ll take off back and forth a couple of times and walk around easily.
I did not make shells for hand gripping in the walls. I will take the cases by the corners.
This concludes my production of housings for horned hives. I planned 10, but made 15.
Why not do it if there was such wonderful material. I also spotted a dry poplar and several aspens on the shore. Enough hives for 50...
By the way, just for fun, I weighed the cases. Pure willow weighs on average 2.6 kg. Further plans include donya and lids. An article about how the first hive was populated.
And on February 26, it was warm and sunny, and bees from all the hives were actively flying around.
PS A year later, I decided to simplify the manufacturing process; I began to simply connect the corners of the hives end-to-end. I make cases with 8 frames. Donya is different too. Details in this article. And now I spread the logs onto the boards like this.
To receive new blog articles by email, subscribe.
I would be grateful if you share this article on social networks:
Related Posts
- So that the horned bodies fit together freely 01/24/2018
- Horned hives. Template for holes.01/23/2018
- Instead of a surface planer02/19/2017
Popular Posts
- Well, let's start, shall we...12/18/2012
- Horned hives. Buildings.02/28/2015
- Rented a retail space 10/5/2014
Peculiarities
Among the features that distinguish such a horned house for bees are:
- Small format, which makes it easy to handle the product even for inexperienced novice beekeepers.
- Good ventilation, which makes it possible for the bees not to overheat during the hot summer months.
- They are easily installed on a platform for organizing a nomadic apiary.
- It is easy to treat the inside of such a house against parasites, including varroa mites.
- Easy to handle for novice beekeepers.
Assembling the Horned Hive
To assemble such a hive with your own hands, you must adhere to the following sequence of actions:
- There is no need to process the boards. It is enough that there are no hard burrs or knots on them.
- It is necessary to knock four boards together so that they form a rectangle.
- The fastenings are special bars that protrude upward beyond the resulting frame by approximately 22 mm.
- The bottom will be double. In this part of the product, a notch is made - a hole so that insects can freely leave the house and return to it with the harvested crop.
- The upper bottom is made of fine-textured mesh. It ensures the settling of all debris that is formed during the life of insects. This way the house remains clean all the time and parasites do not spread.
- The second bottom is made solid and all the waste products of bees are collected in it. It is easy to pull it out of the structure and pour out everything that has accumulated for cleansing.
- After the bottom is completed and the tap hole is drilled in it, it is necessary to begin assembling the fixing frame, which is installed as a roof.
- After completing this step, you need to coat the product with paint to form a protective layer.
- Keep in mind that in the middle zone and to the north, bee houses have to be insulated with polystyrene foam so that the insects emerge in the spring in a healthy and strong condition.
This is how one of the buildings is made. And since there will be several of them, it is possible to fix them together with special bars. It doesn’t matter what size and evenness they are. Thanks to such an unpretentious design of the Palivoda horned hive, it has become so beloved by many beekeepers. After all, no special requirements are placed on her. In addition, with the correct arrangement of all elements, a gap for the tap hole will immediately form and it will not have to be cut out additionally later.
Distinctive features of horned hives
Considering the distinctive features of horned hives, it is worth noting that ordinary ones can be made in several variations:
- with shaped ends, as a result of which they can be attached to each other;
- with a smooth surface.
The hive from Mikhail Polevody is made much more cunning. The sections are made of 4 knocked down boards; bars are used as fastening, which protrude above the body and slightly do not reach the bottom. During the installation process, sections can be placed on top of each other, while the bars are not fastened together, and the body cannot be moved.
It is worth considering that a small gap (5 mm) is deliberately left into which you can insert a chisel and separate the modules if they were glued together with propolis.
Attention! The bars used perfectly cover existing gaps and help strengthen the finished structure.
Using the bottom
The use of the bottom is very rational. On the one hand, the removable option allows:
- Promptly clean up all fallen elements formed during the life of insects.
- Carry out additional antiparasitic treatment without much effort and disassembling the entire structure.
This is how the hygienic function of such a design is achieved.
On the other hand, the specific bottom can be removed in the hot season and only a mesh element can be left at the bottom of the structure. This allows you to achieve a high level of aeration and cooling of the inside of the house by providing fresh air. It is this state, when ventilation is enhanced, that allows the bees to concentrate on extracting honey, rather than clustering along the front wall of the house.
With minimal disruption to the rhythm of insect life, you can perform all the necessary manipulations that a beekeeper must carry out throughout the year to care for his apiary.
With this design, in order to clean the bee house, it is enough to pull out the lower part and, taking out the mesh, shake out the remains of the bees’ vital activity. Periodically passing through disinfection compounds.
Farming
The horned hive, or as it is also called the Palivoda hive, has this name because of the protruding pins and horns. These structural elements protrude from the body at the time of fastening, but in their natural form they are invisible. 10 frames are installed in the main sections of such hives, so the dimensions of the buildings will be small. It has been noticed that such housing for bees takes up little space, so they are often installed in pavilions.
The horned hive is made from dry, high-quality wood, using boards 4 centimeters thick. The design in question consists of six bodies, the lower part, the bottom, as well as the roof and roof, all structures are inserted into the grooves. As we can see, the basic structural elements are exactly the same as those of other types of hives.
If you keep bees in a horned hive in the summer, the ventilation of the bee house will be carried out through a round hole, it is usually installed in the lower part of the hive. When using horned hives, it is possible to control the loss of insects after mite treatment. In this case, it is possible to control the wintering of bees. Here you just need to remove one of the housings and you can determine where the club of insects is moving or look and evaluate the quality and quantity of the remaining food. In the spring, caring for bees is quite simple, since the bodies in the horned hive can be easily removed, which simplifies the work of inspecting insects.
When keeping bees in a horned hive, insects are placed on 145 mm frames. During the period of intensive honey collection, all bee houses are equipped in groups of 4 pieces. After some time, three hives are moved to a new location, forming a section, and the remaining house is used as a honey hive. This combination takes place throughout the season, while the apiary can move to new territories with better honey plants.
To avoid swarming of bees, in the evening, inspect the entrances of the hives, marking with chalk the buildings in which insects have accumulated. The marked houses will need to be checked the next day. If all the worker bees within the colony have a job, then there will be no accumulations of insects on the entrances. The presence of a hole at the bottom in a horned hive allows you to prolong the life of insects, since they save energy on ventilating the home, even with a good bribe.
Preparing a horned hive for wintering includes the following operations:
- a 2-centimeter plate of polystyrene foam wrapped in plastic film is installed on the bottom;
- Next, a housing is installed in which there are frames with honey, as well as a bee colony on 5 frames from the Dadanovsky hive. On the sides of the body, thermal insulation plates, foam plastic, 2 centimeters thick are installed;
- you also need to open the round tap hole in the central body.
After installing a heat-resistant film that will protect the hive from precipitation, the bees can be left in the house for the winter.
Keeping bees
But still, despite the seemingly continuous advantages, before purchasing or creating a horned hive with your own hands, it is necessary to study all the features of keeping bees in it.
Here are the recommendations given by experienced beekeepers who use the Palivoda horned hive in their apiary:
- When the bribe is intense enough, the insects will be able to build approximately 6 buildings filled with dry matter. In this case, you need to set up to 12 frames so that they have enough area to form honeycombs.
- Thus, the collection of beebread increases.
- In this version of the hive, honey will be stored in the lower sections, while the queen with brood will be located in the upper two buildings.
- During the season when pollen is produced in abundance on the trees, 10 days will be enough for bees to fill about 8 frames with beebread.
Horned hive for 8 frames
Thanks to everyone who gave good advice! Using the Photorec utility from the TestDisk program, all deleted images were very easily resurrected. Now I can show you how I made Palivoda hives for 8 frames.
Compared to last time, the process has been simplified even more. The only tool you need is a circular saw, even without a jointer. Mikhail Palivoda made his hives from unplaned blanks. The boards may differ in thickness by, say, a millimeter. The main thing is to maintain the internal dimensions, and all parts of the hive will fit together.
Drawings of the hive with a story about the deleted photos are in the previous article, now I’ll just show the pictures.
For the bodies, I lightly sharpened the boards and cut them into blanks. Material – willow, pine, linden, poplar. A bit of everything. For the “horns” I cut 22x27 mm bars. In the blanks for the hangers of the frames I chose a quarter 10x10 mm. I did this with a cutter like this:
Assembly. I screwed the horns to the end walls. (Later, he began to plan off the ends of the horns, since when they get wet, they bite the bodies).
Next, I placed the walls of the case on the table and secured them with clamps.
By tapping with a hammer, I ensured that the “horned” block was flush with the end of the side wall.
And he turned the screws.
I checked the right angles between the walls - normal. There is no propeller. The housings fit together without gaps.
The thickness of the boards is slightly different.
Some workpieces are poorly processed.
Yes, this is not the main thing. Simple, quite strong, fast.
Internal corners. No gaps.
This is how the frame becomes.
There is an article about these frameworks here.
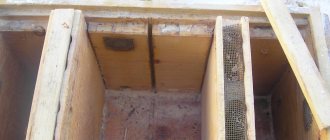
Further. Donya. You need a board 22 mm thick and bars 22x22 mm. The hardest part is making a couple of cutouts in the side walls. One slot:
The second cut is approximately the same, and we get these blanks for the side walls of the bottom:
I also fix it with clamps and screw the parts with self-tapping screws. Front view:
Back view:
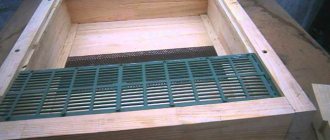
Between the bars there is a gap for ventilation. Inside view of the entrance.
View from the inside of the ventilation slot.
All that remains is to insert the mesh. To do this, I screw a couple more bars to the side walls from the inside, and insert a board from the side of the entrance - I still have such blanks, don’t throw them away...
And I turned this over so that you could see how I attached the mesh to the back.
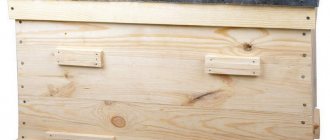
Housing with bottom assembly, front view:
Back view:
In three days, at a leisurely pace, I manufactured and assembled 30 Palivoda hive buildings. Then in two more days - ten donyas.
I didn’t make tap holes in the buildings; they were of no use. This design of the bottom with a high entrance (22 mm) and a ventilation slot allows you to place the hive during migration even in the sun and directly on the ground, providing sufficient ventilation.
I'm thinking of shortening the taphole with an overhead board with a slot. I will screw it to the front wall of the bottom if necessary.
PS I finished the covers and landing plates later. An article about this. Later, Donya began to make people deaf.
To receive new blog articles by email, subscribe.
I would be grateful if you share this article on social networks:
Related Posts
- So that the horned bodies fit together freely 01/24/2018
- Horned hives. Template for holes.01/23/2018
- Instead of a surface planer02/19/2017
Popular Posts
- Well, let's start, shall we...12/18/2012
- Horned hives. Buildings.02/28/2015
- Rented a retail space 10/5/2014
Seasonal work
The normal lifestyle of insects in an apiary requires constant participation and control from the beekeeper. Care does not stop either in winter or in summer. Here are the methods and seasonal work experienced beekeepers use:
- In early spring, check the bottom. This way you can control the temperature and how well the family is developing.
- Inspect the settlement for the presence of parasites. If, for example, varroa mites or any other mites are found, then measures must be taken to destroy them.
- If the hive is clean, then preventive antiparasitic measures are carried out.
- To help expand and strengthen the insect family, it is necessary to rearrange the internal sections and frames.
- In the summer, during intensive honey harvesting, you will have to add an additional section, building the house in height. This is to provide additional frames for the bees to fill with honey.
- If this is not done, then the opportunity to collect a larger number of different types of apiproducts will be missed. And the chances for a full supply of honey for the bee colony for the winter are reduced. This manipulation will allow for complete pumping of honey.
- When the last harvest is carried out, this usually happens no later than mid-August, the depleted combs can be placed in the upper part of the nest. Here they are aged until approximately September. After this, they will need to be stored in a suitable room.
Two buildings in two days
My swarming time is over, only 8 swarms came out, from which I formed 5 good families. Weak swarms were combined by two. I wanted to add a third to one family, but after spending the night through a propolis net in a building above the main family, the swarm disappeared the next morning. I was away, but my parents didn’t notice this fact. Well, okay, it was a weak swarm, it’s not a pity. Now the apiary consists of 44 families. And the trap is still hanging empty.
The offspring in the PPU hive also released a swarm, so the development of the family there has slowed down, there is nothing to write about it.
I placed two good swarms in two “horned” hives on bare foundation. Both families set about building the nest with jet speed. The very next day after settling, the bees were already walking with the pollen, but there was nowhere to put it, so they sat on the arrival site, waiting for the cells to be rebuilt.
On the third day, in both families, all the frames in the two buildings were almost completely rebuilt.
Even the extreme ones are pulled back halfway. I'm glad to try - I got it in the third building. And then this happened. I initially placed the hives very close to each other, on one wide stand.
I see that in the left family the behavior of the bees shows that they do not have a queen.
When the swarm planted, there were at least 3 queens - I saw them. Then, in front of the entrance, I found 4 dead - in swarm fever, either they fought themselves, or the bees strangled them, but in the end, the family was left without a single queen.
So, two days have passed, I see that there is no queen - the bees are running along the walls of the hive, and in the second colony there is a crowd of bees sitting on the fly.
What's the matter? The third day – the picture is the same. I open the hives. The right one is chock-full of bees, the third building of the foundation is almost rebuilt. And the left hive is half empty. It turns out that bees from a queenless colony slowly began to move to the neighboring one. Quiet, peaceful, without fuss and fights.
On the fourth day, in the left horned hive, only the rebuilt foundation frames remained - two buildings, and two dozen bees, cleaning the cells from drops of nectar. The families were completely united, and a fourth building had to be erected. Now it has also been rebuilt.
The white acacia has begun to bloom, a line of heavy bees is arriving, the barely built cells are immediately filled with nectar.
And the very first family in the “horned” family occupies two buildings, I added another swarm to it. The young queen is already laying eggs.
By the way, as I wanted, I put moss cushions into the lids of the “horned” evidence and secured them with wire.
After destroying two families with foulbrood, I discovered another one just like it. It so happened that I didn’t do any layering from her either. I decided not to destroy, but to do things differently.
The family was in a swarm state, I did not expand it, I did not put foundation on the rebuilding. He began to wait for the swarm to come out. Well, she released just a hefty swarm, about 5 kilograms, it didn’t fit in the swarm, I took it off - I thought the pole would break under the weight.
I placed him in a clean hive on the foundation and immediately hung up two strips of Oxybactocide. Paper strips impregnated with oxytetracycline. The bees chew them up and take them out of the hive. The medicine thus enters the body. After a week, new strips are hung, and so on 2-3 times. I will treat and observe.
I took the old family to the forest and put them on the outskirts. I don’t know how many bees there are in it, I didn’t even look. Maybe almost everyone left and left the sick nest. Come what may, there is simply no time to deal with them now. Whether they survive or not, I’ll see later.
The 8 strongest families were taken closer to the acacia tract near the railway. He placed third buildings, distributing the remains of sushi mixed with foundation over them. And it blooms like... As if milk had been spilled. Branches with flowers bend to the ground. And it smells - you'll rock. Let's see what they bring...
To receive new blog articles by email, subscribe.
I would be grateful if you share this article on social networks:
Related Posts
- We are growing little by little06/03/2017
- End of swarming06/06/2016
- Swarming...05/29/2016
Popular Posts
- Well, let's start, shall we...12/18/2012
- Horned hives. Buildings.02/28/2015
- Rented a retail space 10/5/2014