Teaching riders to lighten up to the correct diagonal and “see” it from the side is very interesting. First of all, by how students react. Some people need a lot of information, while others have problems when they get too much information in the beginning. That's why I teach this knowledge in its simplest form first, adding more information as I go.
The simplest form of information we convey to riders is that the marching trot has two beats; We stand under one and sit down under the second.
Up-down, up-down
Any instructor who teaches the trot to newbies has probably repeated this phrase “Up-down, up-down...” millions of times. Admit it, you did it too. At first, when we repeat this “mantra” of ours, we see how the rider flies high from the saddle, when he stands up, hits the saddle, stands idle or sits too long, but the more clearly you establish the rhythm with your voice commands “up and down”, the your beginner is getting closer to the moment when he will finally feel and get into the rhythm. Suddenly, he succeeds, and we shout to him: “Yes! Right! Well done! Up and down, up and down!
Learning to ease up at the trot is a big step in the life of a beginning rider. A whole stage!
I always give my rider time to consolidate his progress before working further with the trot. He will hear about trot diagonals later, perhaps we will do without them for a few more lessons. I wait for the rider to start to ease up at the trot automatically and forget about my up and down cues. The rider must develop feeling and muscle memory.
How to prepare
The initial stage of horse riding training here, as in riding schools, usually takes place on a cord - a long rope with which the trainer can control a horse controlled by an inexperienced rider. Afterwards, the animal and the rider are left alone, and the trainer only gives tips, advice, and recommendations.
How to prepare for your first lesson:
- Arrive early. To take your time getting to know the horse and changing clothes.
- Practice 2-3 times a week so as not to lose acquired skills.
- Do not be afraid. horses sense your fear well.
- Observe safety precautions.
The good thing about clubs is that horse riding is available here at almost any time. You can arrange a horseback ride in the park with the whole family after a hard day at work or school, or on the weekend. And you don’t need to buy any special equipment—everything from a saddle to a suit and boots can be rented at the clubs. So this option of horseback riding is also the cheapest.
I love visualization
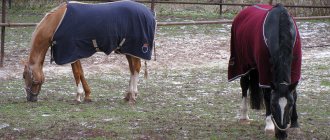
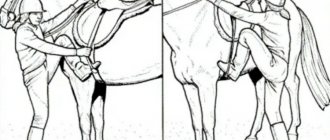
When my student rides at a relaxed trot, controlling the horse, talking and answering my questions, etc., this means that he is ready to learn diagonals. It is very good if you have a “model” rider or a group lesson. I like the phrase: “A picture is worth a thousand words” (it has proven itself hundreds of times!) My “model” rider’s horse has multi-colored bandages on his legs, for example, as in the photo below - red on the right diagonal pair, white on the left.
If I have a group lesson, all the horses will be bandaged in the same way. Of course, you can use two different colors on each horse during a group lesson, but it is better if all horses have a red and white combination. Remember that when you use visualization during training, you are helping your students better understand what you are teaching.
I ask my “model” to go at a marching trot, and I ask the student which two legs of his horse move together. Once the student can identify the diagonal pairs, I explain, “This is why the trot is a two-beat gait. 4 legs, 2 pairs = 2 beats.” I leave further lynx theory for another day. Remember that too much information and detail can be confusing for a student when trying to grasp the basic concepts of horsemanship.
While the “specimen” is trotting, I ask the student to say out loud “up and down” in his ri relieve himself under the right diagonal and tell the student: “You see that our “specimen” is sitting in the saddle whenever his legs in red bandages are on the ground "? It usually doesn't take long for the student to see this.
Then I ask the “model” to change the diagonals, and the student to name which diagonal it is easier for. Now I can accurately understand whether my student really sees diagonals. Then I ask the “model” to ride along the diagonal that the student distinguishes better (usually it turns out to be the inner one). I ask the student to look at the horse's shoulder and note to him that the rider is sitting in the saddle when the shoulder goes back.
As soon as my student sees the shoulder move, I let the “model” rest and ask the student to trot along the arena. His job is to determine which shoulder goes back when he gets into the saddle. I jokingly tell him that this is the first and last lesson when I don't scold him for looking down at the horse's shoulders.
Climb
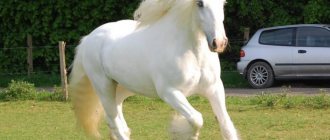
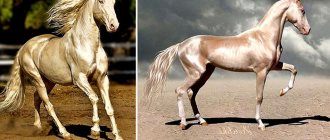
Ideally, when trotting, the hindquarters and forequarters should rise equally. If the horse's forehand rises higher than its hindquarters, it means the horse is not working hard enough with its hindquarters, and vice versa. This is clearly visible if you compare the angles of the shoulder and hip. Remember that the front and rear legs should rise equally.
Look at the photos below. Always begin your assessment of movement with the hind legs. Pay attention to the distance from the top of the croup to the bottom of the leg. Compare it to the distance from the top of your shoulder to the bottom of your leg. The first horse is unbalanced, he lifts his forehand and hindquarters differently. Horses with such a trot are not suitable for breeding.
The second photo shows a correct trot with an even rise in the forehand and hindquarters. The higher the rise, the wider the increase and the greater the suspension.
Simple explanations
I skip the information about the “correct, incorrect” diagonal, leaving it until the student can easily identify the diagonal. This is after I will tell him about tournaments and traditions, explain that the horse pushes the rider with its hind leg, and we need to train its hind legs evenly. But for now, we are sticking with left, right or red, white for students who have difficulty quickly identifying right and left hands.
After the rider learns to determine the diagonal, we begin to introduce variety into the work.
I tell you the number of steps the rider will need to sit in the saddle before starting to ease up again. We discuss how to move from one diagonal to another, and also that if an even number of steps sits, the rider will return to the same diagonal that he rode before, and if an odd number, the rider will change the diagonal. I teach riders that they can stand or sit for one beat to change the diagonal. Pretty soon my student becomes a diagonal pro.
I use this method of teaching diagonals when I teach both adults and children. Typically, once the rider has control of the mechanics, he is ready to learn what the diagonals are for. That’s when I talk about diagonal pairs, equal training of the hind legs, etc. At the same time, I begin to get my rider to think about the horse's hind legs, which push him out of the saddle, developing awareness of the horse's "engine."
If you load the student with theory from the very beginning, an adult rider can turn learning diagonals into a complex puzzle, mentally stopping himself from moving. I prefer to keep the training simple, because the main thing is not to show the students how much I know about the trot, but to instill in them the necessary skills and bring them to automaticity. It's about explaining things simply and allowing the student to understand what it's about and put it into practice.
If the rider gets stuck
But what to do with a student who is “stuck” and needs help, who does not see the diagonal? Will I surprise you if I tell you that this problem is more common in adults than in children?
Videos are a great teaching tool, so I went to Youtube to find a video that showed a good example of diagonals clearly and clearly. I was a little surprised that it wasn't that easy. Even more surprised, I discovered that one woman, sitting on a stool, casually explained the trot theory in an interview format, while the horse never appeared in the frame at all. After an hour of searching, I selected two videos that at least showed horses with a good stride and riders who clearly ride the correct diagonal. The first one is very short, but the diagonals are visible very well:
Students can watch the video again many times to visualize. The second video is a trotting lesson, and I suggest you turn off the volume so as not to be distracted by the text, but to hone your vision:
Remind your student that he will need to use his soft eye and peripheral vision to see both the horse's stride and the rider's movements at the same time.
I'm a firm believer that confidence is built by vocalizing what's happening, so when you're watching videos (or even watching riders live), you should say "up and down" loudly and clearly in rhythm with the rider's movement. Continue saying “up and down” until you get to the point where you can only see the diagonal in the “down” position. Once this ri is in your head, start looking at the horse's front legs or one diagonal pair to determine which leg is moving with the rider.
How to learn to get into the rhythm of a horse's movement
All difficulties come only with the transition to a trot, when the horse begins to throw the rider up. Some horses throw more, others less. The slower the movement, the easier the rider copes with this toss. If he has to ride fast, and even on a shaking horse, then he, of course, experiences great inconvenience.
A novice rider, trying to avoid being thrown, involuntarily squeezes the horse’s sides with his legs , but this does not achieve the desired result. As a result, an inexperienced rider experiences abrasions, stiffness of movement and a feeling of uncertainty.
All this can be dealt with by learning to control the muscles of the lumbosacral region. Of course, a person usually makes natural movements without thinking, but since in the art of horse riding a special role is assigned to the ability to control the lumbosacral muscles, this issue should be emphasized in order to emphasize its importance. But even if the rider learns to correctly perform movements with these muscles, this does not mean that he will be able to skillfully influence the horse from the very first steps.
Just as a swing can be rocked by changing the tension in the lumbosacral region, so can a horse be encouraged to move forward. If she is already in motion, then you can try to adapt to this, enter into the rhythm of the movement, and accompany it with your body. If the rider already knows how to move the horse correctly, then it means he knows how to accompany its movements; if he does not know how to do one of the two, then it is clear that such a rider does not know how to do either one or the other.
Article on the topic How to develop the correct seat on a horse?
Many riders, even experienced ones, do not understand that the ability to enter into the rhythm of the horse’s movement is the basis of correct seating , without which there can be no subtle message. You shouldn’t think that it will come naturally over time, you need to learn it. And it must be said that a well-trained horse is the best teacher, because it immediately reacts to the slightest muscle tension in the rider’s lumbosacral region.
When the horse moves from a place, the rider, if he makes a push not only with his legs, but with the muscles of the lumbosacral region and legs, feels that he is making do with minimal pressure from the legs. The better a rider can use the tension of these muscles, the less leg pressure he will need to use.
Through the efforts of the muscles of the lumbosacral region, the rider can stop the horse, but he will feel that the stop is not happening as before. Without the action of this muscle group, the horse was held by the strong pressure of the reins on the mouth. Now the rider only barely pulls on the reins to make the horse stop. At the moment of stopping, the rider feels the horse give in its hind legs.
To understand the effect of the rider on the horse with the lumbosacral region, it is necessary to repeatedly repeat the beginning of the horse’s movement and its stop, switch from a walk to a trot and stop; and so all the time, changing the pace, moving from a walk to a trot and again to a walk, stopping the horse, and then starting it again. If you do not understand this on your horse, then you need to take another, well-trained training horse and ride it until this understanding comes. If in this case you cannot find contact with the horse, then, most likely, it will not be possible to teach you horse riding.
Accordingly, you first need to understand that starting a movement from a place and stopping it using the efforts of the lumbosacral region and without them are significantly different. And only a rider who has learned to confidently influence the horse with the muscles of the lumbosacral region is able to prevent the horse from throwing up too much.
At a slow trot, the same force of the lumbosacral region that acts at the beginning of the movement and stop, the pelvis and center of gravity of the rider shifts forward. The rider, with the help of his legs and the muscles of the lumbosacral region, seems to be pressed into the saddle. Thus, without much effort, a closer contact between the rider and the horse is established. On well-trained and less shaking horses, contact comes much faster. This comes from frequent changes of tempo, because the correct tension in the lumbosacral muscles at the start of the movement and when stopping is carried over into the trot. The higher the horse throws and the faster the pace of movement, the more the muscles of the lumbosacral region should be tensed. If the rider believes that he has already penetrated to some extent into this secret, then his ability to work the lumbosacral muscles should be tested on other horses.
The rider's seat can be considered correct if, at a shortened trot, not only on one, but on many horses, the rider does not dangle in the saddle and endures the movement, sitting so confidently and calmly that a piece of paper placed under him on the saddle can hold on.
Getting into the rhythm of the horse's movement is always something flexible, felt, which never requires effort and does not involve large movements. Therefore, an attentive observer can detect it not by external signs, but only as a result of influences on the horse. A rider who has this skill sits comfortably on the horse and bounces less than others. Sudden movements of the rider's pelvis, a loose fit to the saddle, or an overly arched back have nothing to do with the ability to control the muscles of the lumbosacral region. The rider, tensing these muscles, can lean back a little, but this will not help him get into the rhythm of the horse's movement.
Article on the topic Rider muscle relaxation
Sometimes you can hear from a trainer that the rider should sway his body in time with the movements of the horse. But this advice has not helped anyone yet. Oscillations to the beat, that is, entering into the rhythm of the horse’s movement, do not appear by themselves, but arise only from active muscle movement, a conscious desire to move forward, as on a swing; the forward movement occurs due to the tension of the lumbosacral muscles, and simple rocking has nothing to do with the impact on the horse.
Source: V. Museler “Riding School”, Translation from German by N. A. Savinkov. Under the general editorship of Professor I.F. Bobylev. Moscow "Progress", 1980
Think about the wheel
Now we need to think about something else. The horse's front leg does not actually rise and fall like a piston. She does a much more complex movement. Think of your front leg as if it were moving along the path of a wheel. Half the rotation is on the ground, the other half is in the air. The front hoof actually lands on the ground in front of the horse as its leg is brought forward, and remains on the ground until it is behind - under the horse. Since the trot is a two-beat gait (for the purpose of my explanation, a beat up and a beat down), a rider who is riding at the formation trot will lower himself into the saddle and sit while one or the other of the horse's forelegs steps onto the ground and then under the horse's body. (Technically, if the horse is not pushing forward, his body is going over the leg, but to simplify, you can think of the leg going back under the body.) Try to keep this picture in your head as you watch the video. Look at both front legs as you say "down-down-down" in rhythm with the rider's relief. Soon your eye will make the connection.
Which leg should you ease under at the trot?
In the last article I touched on the topic of diagonals at the trot, in this post we will try to figure out which leg to lighten under and whether there is a difference.
Let me remind you that the trot is a push-pull gait with alternate extension of diagonal pairs of legs (left front + right hind and right front + left hind). The rider at a light trot sits in the saddle at one pace, and rises above the saddle at the second. We'll talk about the technique of performing this lift another time, but now the diagonals.
When moving in an arena or a volte, you can relieve yourself on the inner or outer diagonal. Now there will be the first confusion in terminology. Some trainers and riders determine the diagonal by the front leg, others by the back leg. Let's agree that in this post we will determine the diagonal along the front leg. Those. we synchronize the rise of the rider from the saddle with the extension of the shoulder, this option is more convenient, because Beginner riders, and even some experienced ones, do not feel which leg they are easing under, and can only check themselves visually. Looking at the shoulders is much easier than looking under the horse in an attempt to determine where its hind legs are.
According to this logic, when driving to the left, the outer one will have a right diagonal (i.e. the right front + left rear are moved forward), and the inner one, accordingly, will have the opposite left one. Which one should you stand under?
The dressage rules do not indicate which leg to relieve under. In dressage patterns, the light trot is only present in young horse rides and beginner patterns. In the judges' comments you can find recommendations to lighten the outer diagonal, but they are only advisory in nature. And if you ride the pattern under the inside diagonal or forget to change it when changing direction, this will not affect the score if the horse has not lost its balance and uniformity of movement for this reason.
Until the early 2000s, many, if not all, Russian coaches taught to relieve themselves to the inside diagonal. This comes from cavalry and is based on the fact that the rider sits on the outside hind leg, which in theory should give greater stability when turning.
The Western school (and the majority of current coaches) teaches to relieve yourself under the outer diagonal. And they also have arguments. They believe this can make the horse lighter and more flexible simply because the weight is taken off the inside hind leg.
The second, more meaningful argument is the fact that horses quite often tend to put their hindquarters inward when turning. By lightening to the outside diagonal, the rider has greater leg freedom to correct this problem.
In general, all riders and all horses are one-sided. If you try to do walk-easy trot transitions on a loose rein, without paying attention to the light leg when transitioning into trot, you will most likely end up on the same diagonal more often than not, in fact, there are horses that can do a lot to move the rider to a diagonal that is convenient for her (although if this happens constantly, it makes sense to contact a veterinarian or chiropractor).
Conclusion: there is no objectively proven difference in which diagonal to lighten. The difference appears only on the side elements, and only under the condition that there is a need to do them at a light trot, but there this difference is not tied to the walls of the arena in any way and the diagonals, for example, on the traverse and ranverse will be different. But it is important to consider that the back leg on which you sit receives more load than the one on which you relieve yourself. It follows from this that it is important to change the diagonals and work evenly on both.
I teach my riders to lighten themselves under the outer diagonal, bringing it to the point of automaticity, only for the reason that they do not forget to change it and are able to independently monitor the uniformity of the load in both directions. Agree, remembering how many times you changed direction is easier than remembering changes in direction + changes in diagonals.