SPECIFICATIONS
Power supply ………………….……50 Hz 220 V Backup power ……………………………………….12 V Maximum power (in brackets for BLITZ 72)……50 W (60 W) Operating temperature range ………………….…35 – 40 oC Accuracy of maintaining the set temperature…… 0.1 o Necessary environmental conditions……………… from +17 oC to +30 oC; from 40% to 80% RH Capacity of reference chicken eggs (in brackets for BLITZ 72)….. 48 (72) pcs. Air exchange………………………………forced Number of trays…………………………………….…1 pcs. Turning type……………….…………………automatic Humidity maintenance……………………………..…..water evaporation with forced airflow Adjustable humidity range……..from 40 % up to 80% RH Accuracy of maintaining the set humidity….. 3% RH Overall dimensions (in brackets for BLITZ 72)………………….………………540x350x310 (715x350x310) Weight (mass) (in brackets for BLITZ 72)…..………8.0 kg (9.6 kg).
SAFETY REQUIREMENTS
4.1. Begin working with the incubator by thoroughly reading this manual. 4.2. Do not use homemade fuses or fuses with rated currents different from those specified in this manual. 4.3. Before performing maintenance, cleaning, maintenance or repairs, completely disconnect the incubator . 4.4. Do not use the incubator if the insulation of the power cord is damaged. 4.5. It is prohibited to install any objects on the incubator or closer than 0.3 m from it. Don't cover it! 4.6. It is prohibited to repair mechanisms yourself. 4.7. Attention! When bringing the incubator from cold air into a warm room, it is necessary to keep it for at least 4 hours and only then plug it into the electrical network.
DEVICE
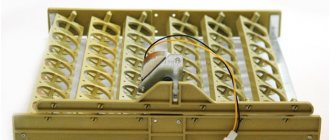
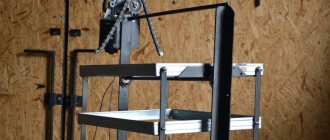
The incubator is a rectangular box. A control unit is attached to one of the side walls of the incubator body. The control unit contains the mechanisms and elements of the apparatus, except for the fan and heaters, which are located on the side of the incubation chamber. All of them are rigidly attached to the side wall of the incubator. The incubation chamber contains a grid tray for eggs and 2 baths for air humidification. The incubation chamber is closed at the top with a lid. The temperature control knob is located on the control panel. To change the set temperature, press the “Heat” and “Rotate” buttons simultaneously for 5 seconds. The numbers on the display will start flashing. At this time, turning the adjustment knob clockwise will increase the set temperature, turning it counterclockwise will decrease it. To exit the temperature programming mode, simply do not turn the adjustment knob for 10 seconds. The numbers on the display will stop flashing. The actual temperature will be displayed. Turning the knob outside the programming mode displays the set temperature value in a rapidly flashing mode. The “220 V MAINS” indicator is located to the left of the display. The indicator lights up when the incubator is connected to a 220 V network. “Heating” indicator Indicator of the heating element status. It is located on top of the “HEATING” button. The indicator is constantly lit when the heater is on. “Heating” button Pressing and holding the button for 3 seconds will completely turn off the heater. Three dashes will appear on the display and the indicator will go off. The heater is turned on by the same long press on this button. Three dashes will appear on the display and the indicator will light up. The Rotate indicator shows the status of the auto-rotate function. Located above the “ROTATE” button. The indicator is flashing - it is in the handle control mode. Does not light – the automatic rotation function is disabled. Constantly lit - automatic rotation is enabled. The Turn button is located on the control panel above the temperature control knob. A . To enable the automatic rotation function, you need to press the “ROTATE” button and hold it pressed for about 3 seconds. The rotation status indicator will light up and the tray will rotate to its fullest position. From now on, turns will occur automatically every 2 hours. The indicator will remain lit continuously. to control the turn: B. Press the button. Dashes will appear on the display. The turn indicator will start flashing. IN . While the turn indicator is flashing, you can turn the temperature adjustment knob to control the turn motor and place the egg tray in the desired position. G . If the control buttons are not pressed while the indicator is flashing, then after 10 seconds the rotation system will go into the “off” state. The rotation will stop. The indicator will go out. Enabling automatic rotation: see step A. Fan. Always on. Attached to the wall separating the incubation compartment and the control unit. The fan is equipped with heating elements that operate under a voltage of 12V. The protective mesh covering the fan also serves as a limiter for the angle of rotation of the egg tray. The tray can touch this mesh. Humidity regulator. Two baths of water create the humidity necessary for incubating waterfowl eggs. To incubate eggs of non-waterfowl (chickens, turkeys, etc.), you need to use 1 tray. The outlet (on the housing wall farthest from the control unit) and inlet (on the control unit) ventilation holes must ALWAYS be open. Behind the fan there is an adjustment hole and a damper. This damper controls the humidity level in the incubation chamber. The values are plotted on the scale taking into account the full load of the incubator with eggs. Without eggs, the humidity level will be lower. In a position where the clearance of the ventilation hole is minimal, a complete 5-fold change of air is ensured within 1 hour in the incubation chamber. WARNING: It is very easy to create high humidity in this incubator. Don't increase the humidity! High humidity causes more harm to the embryo than low humidity! In doubtful situations, set the humidity to low. Battery backup. A 12 volt battery should be used. The battery is not included with the incubator. If there is a threat of a power outage in the 220 V network, you need to connect a fully charged battery through 2 insulated copper wires with a cross-section of at least 1.5 mm2. and no more than 3 meters long to the connector on the side wall of the control unit. When connecting, observe the polarity; connect the “positive” wire to the “positive” terminal of the battery and to the red connector of the incubator. “Negative” only to the black connector. In the mode of maintaining the temperature in the incubator at the operating level, if the room temperature is +23 ° C, a fully charged, serviceable battery of type 6ST55 will allow the incubator to operate normally for 22 hours (for BLITZ 72 -18 hours). The battery from the incubator does not charge. Charge the battery using special chargers. If there is a power outage in the 220 V network, the incubator will automatically switch to battery power. The “220V NETWORK” indicator on the control panel will go out. When the 220V power supply is restored, the incubator will also automatically disconnect from the battery. No additional settings are required for the incubator to operate from different power sources.
An indispensable farmer's assistant - the Blitz-48 incubator
The Blitz 48 incubator is an automatic household device with a built-in thermometer and humidity regulator. In addition, it is suitable for incubating not only chicken eggs, but also quail, duck and goose eggs. This review will discuss the device in some detail.
The automatic device is highly accurate. It has all the necessary functions to ensure that egg incubation does not cause problems for poultry farmers.
The Blitz 48 incubator has a temperature regulator. This device is highly accurate. There is also a digital thermometer and a fan to help control air exchange. The developers provided for the possibility of the device operating in the event that the voltage is automatically turned off.
An automatic incubator includes baths into which you need to pour water to maintain the required level of humidity. Supplying water does not imply opening the chamber of the device. This will prevent temperature surges. Using mechanical dampers, humidity can be controlled between 40% and 85%.
The body of the device is made of plywood. However, it should be noted that the walls were insulated. Polystyrene foam was used for this. The automatic incubator is equipped with a transparent top through which it is possible to observe the hatching process. The internal compartment is covered with galvanized sheet. Due to this, it was possible to ensure that the microflora was at the required level.
The eggs are laid in a tray. Through a program, it turns in different directions every few hours. A thermometer is required to monitor temperature. Its accuracy is quite high.
Even if the voltage is turned off, Blitz 48 will continue to work through the battery. There is no need to configure the device additionally for this.
The battery life of the incubator reaches 22 hours.
Technical features
The Blitz 48 incubator has the following technical parameters:
- device power reaches 50 W;
- the device operates from mains (220 V) and battery (12 V);
- the incubator holds 48 chicken eggs, 38 duck eggs, 20 goose eggs, 34 turkey eggs, 130 quail eggs;
- the temperature is maintained at an optimal level;
- eggs turn automatically;
- The weight of the incubator reaches 9 kg.
Blitz-48 is capable of providing the opportunity to hatch a wide variety of eggs. But the features of the device do not end there. The device has a rectangular shape, so it can be placed almost anywhere. The external control unit is located on the side wall.
The device is made of moisture-resistant and heat-insulating material. Heating elements with a fan are located on the inside of the device.
The egg trays in the Blitz-48 incubator are located almost in the center of the chamber. At the same time, the designers took into account the distance for turning in different directions. The installation of the trays depends on what eggs need to be hatched. Two containers will need to be installed if the eggs are from waterfowl. One bath is enough for hatching chickens and turkeys.
The heating elements can be turned off, leaving only the fan running. Due to this, the chamber can be cooled.
Advantages and disadvantages
As reviews show, the Blitz-48 is an excellent household device with excellent parameters, functionality and quality. At the present stage, this incubator is in a leading position in sales, as it meets all requirements.
pros
The advantages of the device include:
- Versatility. The device can be used to hatch different eggs.
- The device is reliable and convenient.
- There is an automatic mode that ensures smooth turns of the trays. This function allows you to control the temperature.
- You can adjust the humidity level without opening the chamber.
- Blitz 48 is a spacious device.
- The device is easy to operate, since there are no complex electronics.
Minuses
There are not many negative traits compared to the advantages. However, there will always be picky buyers who will find shortcomings in the 48 model.
At the present stage, there are several negative aspects that are inconvenient for some bird owners:
- It is inconvenient to fill with water, since the hole in the ventilation compartment is quite small.
- It is inconvenient to load eggs into trays that are already installed inside the device. You can carry out this operation from the outside, but in such a situation it will be inconvenient to install the trays themselves in the required place.
Impressions regarding working with the Blitz 48 incubator will be described in the video. Be sure to watch it to understand what this equipment is.
This is where the negative aspects characteristic of the Blitz 48 device end. We can safely say that the incubator is ideal for home use. The warranty period is two years. But, as reviews show, after this period the device continues to work properly.
Preparatory work
The developers included in the package of the Blitz 48 device not only a detailed manual for use. There is also an incubation calendar for different types of eggs. This will benefit those poultry owners who have just started breeding. This is what most reviews indicate.
All documentation indicates the required temperature, humidity parameters, cooling conditions and incubation time, taking into account the type of eggs.
Settings
Preparatory work, according to numerous reviews, will not take too much time. In addition, they can be easily dealt with using detailed instructions.
The main thing is to check for functionality. Please note that the temperature sensors must function correctly, as well as the automatic tray rotation mechanism.
It is also recommended to check the serviceability and level at which the battery is charged.
When checking for faults, it is recommended to fill the containers with the required amount of water. Please note that it should be warm, not cold or too hot.
After the above described manipulations, it is necessary to configure the temperature sensors by setting certain indicators.
When all the simple manipulations are completed, you can start working with the device.
Laying eggs
A fairly important step is choosing the eggs that you plan to hatch using the Blitz 48 device. They will need to be cleaned of dirt and feathers. It is not recommended to wash eggs to avoid spoiling them. The maximum number of eggs must not be exceeded. This parameter is indicated in the manual in sufficient detail for each bird species.
If you exceed the number of eggs, this will negatively affect not only the turning mechanisms, but also the safety of the product. They won't be able to roll over. This will negatively affect the survival rate, reducing it to almost minimal levels.
In many cases, poultry farmers who have tried the Blitz 48 device and others like it talk about their irreplaceability. They are completely autonomous, which saves time. In addition, the incubation process can become quite productive. The result will be a high hatchability rate and a healthy generation.
It will be difficult for beginning farmers to do without automatic equipment. It can help you achieve low costs and high productivity. More details about preparing the incubator and setting it up will be discussed in the video.
Loading …
Source: https://klyv.ru/kury/opisanie-inkubatora-blits-48-3609/
PREPARING THE INCUBATOR FOR OPERATION
6.1. Place the incubator on a solid, flat, horizontal base. A new incubator may have an odor. This is fine. 6.2. Open the lid, place 1 or 2 baths on the bottom near the side walls. Pour fresh, clean water into the baths, the temperature of which is 42-45 oC. For chicken and other non-waterfowl eggs, it is necessary to set the humidity to 40-45%, right before the start of hatching and before the end of hatching, 65-70%. For waterfowl eggs 60%, at hatching 80-85%. You can control the humidity level by the condition of the air chamber of the incubated eggs. The air chamber should not increase noticeably by the seventh day of incubation. Conversely, by the end of the 18th day its size should reach 1/3 of the egg. 6.3. Lower the egg tray all the way with the side with the aluminum insert onto the square shaft of the gearmotor, and the other side onto the round support pin. 6.4. Close the incubator. 6.5. Set the humidity control valve to the desired position on the humidity scale. 6.6. Plug in the incubator. 6.7. Turn on the Heat and Auto Rotate functions. 6.8. Check the temperature setting at 37.8 °C (turn the knob - flashing numbers). Wait at least 2 hours for the incubator to warm up completely. This incubator requires a temperature of 37.8 °C. TAKE YOUR TIME! 6.9. Check the operation of the rotation mechanism, the rotation angle clockwise and counterclockwise should be 45 (+/-5) degrees, Check the operation of the fan. Make sure the thermometer is working properly. 6.10. Connect the battery to the incubator. Unplug the incubator from the 220 volt outlet. Check the operation of all incubator mechanisms according to paragraphs. 6.7.- 6.9. 6.11. Connect the incubator to a 220 volt network. Make sure that the incubator is disconnected from the battery and switched to power from a 220 volt network.
Blitz incubators and their uniqueness
The Blitz incubator range is produced in Orenburg (Russia). The Blitz incubator has excellent quality indicators and is in great demand. What are its advantages?
- Can operate from a 220 V network or from an alternative 12 V source.
- It is galvanized on the inside to extend its performance for years to come. While similar plastic and foam incubators wear out quickly, this one lasts for years without major changes.
- Accurate temperature. The Blitz incubator can maintain one temperature for a long time.
- Does not rust.
- It has a thick, hard body.
- It has a warranty period of 1-2 years if you buy from the manufacturer.
- All models have a built-in fan and auto-rotate grille.
Blitz incubators have several models that differ in certain characteristics, such as capacity or functionality.
INCUBATION
Please don't experiment! For the first time, do EVERYTHING as written in the instructions:
7.1. Select eggs suitable for incubation: from a full-fledged parent flock (the presence of males is required), fresh (no more than 10 days), stored at a temperature of +10 to +15 oC, regular shape, medium size, clean (but not washed), without cracks, sagging. 7.2. Bring the eggs into a warm room and let them warm up for 6-8 hours, preferably to 25 °C, but in no case more than 27 °C. 7.3. Set the humidity control knob to the desired position. Be sure to fill 1 bath with warm, clean water. When incubating waterfowl eggs, it is recommended to pour water into 2 trays. If the incubator is located in a room with dry air, you should pour water into 2 trays even when incubating eggs of non-waterfowl. 7.4. Plug in the incubator and warm it up to an operating temperature of 37.8 °C.
7.5. Place the tray inside the incubator in one of the extreme inclined positions. Start laying eggs from the bottom edge of the tray. Place the eggs tightly so that there is no empty space left. Eggs should be laid either sideways (so that the long axis of the egg is parallel to the axis of rotation of the tray), or with the blunt end up. 7.6. Close the incubator with a lid. Check that the heater and turning mechanism are turned on. Since the eggs are relatively cold, it will take longer to establish the set temperature than when the incubator is “idle” warmed up. 7.7. The temperature level in the incubator should be checked at least once a day. After 3 days you need to add water. Pay attention to the operation of the turning mechanism. 7.8. At the beginning of the second half of incubation, forced cooling of the eggs is necessary. To do this, turn off the heater using the button on the control panel. Open the lid for 10-20 minutes. Cooling is considered sufficient if, when the egg touches the closed eyelid, the heat of the egg is not felt. Hypothermia is harmful to eggs. Cooling should be done twice a day until hatching begins. Duck and goose eggs should also be sprayed with cool water. Once cooling is complete, turn on the heater and close the incubator with the lid. If you want to increase the flow of fresh air into the incubator, then to maintain humidity it will be necessary to increase the area of the water surface. In front of the fan, you can place additional baths with a height of no more than 25 mm. After increasing the area of the water surface, the humidity level should be monitored using a hygrometer. Without a hygrometer, you can approximately calculate the humidity value using the following pattern: an increase in the water surface by 2 times leads to an increase in relative humidity by 1.5 times. 7.10. Two days before hatching, you must stop turning the eggs. The eggs themselves must be laid sideways and quite loosely. Pour water into all baths. You can put an additional container of water to create increased humidity. As a hatching incubator, it is more advisable to use another incubator without a fan and a rotation system, and this incubator as an incubation one. This incubator can also be used as a hatchery without restrictions. The standard incubation period for eggs at ideal temperature is for: egg hens - 21 days; broiler chickens – 21 days 8 hours; ducks, guinea fowl and turkeys – 27 days; goose – 30 days 12 hours; Muscovy ducks – 33 days 12 hours; parrots - 28 days; pigeons – 14 days; swans - from 30 to 37 days; pheasants – 23 days; quails and budgerigars – 17 days. Before hatching quails, it is necessary to close the gaps between the body and the tray so that the chicks do not fall into the baths. 7.11. As the chicks hatch, after the plumage has dried, they should be taken out of the incubator at intervals of about 8 hours and the shells should be thrown away. 7.12. The hatched young animals are collected and kept in a warm, clean place. It is good to carry out the first feeding no later than 12 hours after hatching.
MAINTENANCE AND STORAGE OF THE INCUBATOR
8.1. BEFORE CARRYING OUT ANY MAINTENANCE WORK ON THE INCUBATOR, IT IS NECESSARY TO DISCONNECT IT FROM THE ELECTRICAL MAINS. 8.2 Before incubation, you need to carefully wipe the incubation chamber, lid, tray, mesh, trays, fan with a weak (pink) solution of potassium permanganate. 8.3 After incubation, wipe the elements listed in the previous paragraph with warm soapy water and dry in direct sunlight. 8.4 The incubator can be stored in any premises where it is protected from precipitation, aggressive vapors and mechanical damage.
Digital incubator Blitz 120
Incubator "Blitz" 120
The Blitz 120 incubator belongs to more serious, one might say, semi-professional models. It surpasses all of the above incubators, both in functionality and quality of work, but it also costs much more. So, what makes it special?
- Their construction is polystyrene foam (30 mm), covered with plywood on the outside. Everything inside is metal. There are convenient round viewing windows.
- Weight 11.4 kg, dimensions 715x350x360 mm.
- The electronics are digital and can be programmed. The display itself has large, clear numbers.
- It can hatch up to 120 chicken, 40 goose, 695 duck, 330 quail or 84 turkey eggs.
- The set includes 2 egg trays.
- Power 80 W. Can be powered from mains or battery.
- There is an audible alert that sounds if the battery is almost empty or if it has just turned on. It also lets you know when the internal temperature changes.
- There are 2 fans, which is natural for large incubator sizes.
- The set includes 4 water trays and a funnel for topping it up.
Disadvantages: this model provides 2 trays for eggs, but the expanded functionality requires the purchase of new trays in the future, and this, one way or another, is an additional expense.
POSSIBLE MALFUNCTIONS AND WAYS TO ELIMINATE THEM
9.1 When the incubator is plugged into a 220V network, the incubator does not work: • Check whether the incubator is running on battery power; if it does, then the power supply or power cord is faulty. 9.2 The incubator does not heat: • The heater is turned off (turn it on with the button on the control panel). 9.3 The incubator does not heat evenly: • The fan is faulty (replace). 9.4 Automatic rotation does not work: • The egg tray is not installed on the gearmotor shaft (remove the tray, turn on manual rotation, and rotating the handle, set the shaft to the middle position. Place the tray on the shaft). • The rotation gearmotor or its connection circuit has failed. 9.5 Emergency battery power does not work: • Check that the battery plus and minus connections are correct. • Check the battery. • Very thin wires that connect the battery to the incubator (replace the wires so that the cross-section of the conductor is at least 1.5 sq. mm). 9.6 The display shows the wrong temperature. • The digital temperature sensor is faulty (replace).
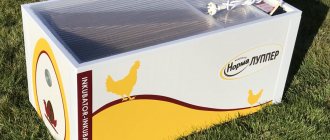
Description of the Blitz norm incubator
Incubator "Blitz Norma"
The predecessor of “Blitz Norma” was “Blitz Ts6”. These models are almost identical, but the Blitz Norma has a simpler and lighter body. Thanks to this, the company was able to reduce the cost of them and accordingly increase demand. Externally it looks like a white box. The body of this model is made of extruded polystyrene foam (foam), up to 30 mm thick with a smooth film on the surface.
- Power supply 220 V, power 60 W. There is also a backup power supply from a 12 V battery.
- The weight of the incubator is 4.46 kg, and the exact dimensions are 705x365x330 mm.
- There is a fan, which allows you to avoid ventilating the incubator from time to time, saving valuable time.
- Humidity regulator with damper 30-85%. The Blitz incubator has a more advanced (convenient) water addition system.
- The built-in digital thermometer allows you to easily check the internal temperature from time to time and adjust it as needed.
- The device has an automatic rotation function every 2 hours for 72 chicken or 24 goose eggs.
- The incubator notifies you of the end of any function with a signal, and the sound is loud, and not quiet as in some other models.
Among the disadvantages of this model, breeders usually note that there is no tray for quails; it must be purchased separately.
WARRANTY AND WARRANTY REPAIR PROCEDURE
10.1 The manufacturer guarantees the proper operation of the incubator for 24 months from the date of its sale, provided that the consumer complies with the operating rules. 10.2 Carrying out repairs before the expiration of the warranty period (at the expense of the manufacturer): 1) Contact the nearest repair shop for household electrical appliances or a qualified technician. After repairs are completed, provide the manufacturer with a verified amount of paid services and repair parts for reimbursement of these costs. 2) Request from the manufacturer the parts necessary for repairs, if it is not possible to purchase them locally. Get technical advice. 3) Send a fully equipped incubator to the manufacturer’s address for repair. Include in the parcel a LETTER describing the fault and a warranty card for the incubator. For mailing, the incubator must be packaged securely. 10.3 Repairs after the expiration of the warranty period are carried out in the same manner, but at the expense of the buyer.
Blitz incubator scheme: