Why is this necessary?
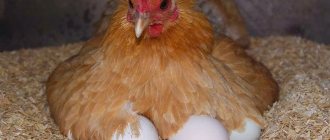
This process is necessary to ensure the normal development of the embryos. Periodically turning the eggs in the incubator allows the chicks to receive heat evenly and hatch at the right time.
If you turn the source material correctly, this will allow you to rationally use the protein. In addition, if you carry out the revolution in accordance with the rules, the chickens will not stick to the walls and will not become hypothermic.
When a novice poultry farmer does not know how many times to turn the eggs in the incubator, this can lead to the death of the embryos. They can die due to the fact that the temperature regime is not observed, or the humidity does not correspond to acceptable values.
Turning the eggs allows the heat to be distributed evenly without overheating.
How to make a rotary mechanism with your own hands
While it is quite easy to assemble a housing for an incubator from scrap materials (wooden boards, plywood boxes, chipboard sheets and polystyrene), building an automatic egg turner is more difficult. To do this, you need to have at least a little understanding of mechanics and electrical engineering. The main thing is to understand the operating principle of this device and strictly adhere to the chosen drawing.
What will you need?
To build a small frame incubator, you need to purchase ready-made parts, take used items, or make your own:
- body (wooden box insulated with foam plastic);
- tray (a metal mesh attached to wooden sides, and a wooden frame with limiting sides, the distance between which corresponds to the diameter of the eggs);
- heating element (2 incandescent lamps 25–40 W);
- fan (suitable for a computer);
- rotation mechanism.
Composition of automatic rotating device:
- a low-power motor with several gears with different gear ratios;
- a metal rod attached to the frame and motor;
- relay for turning the engine on and off.
Main stages of mechanism construction
When the incubator is ready, it’s time to assemble the automation:
- All parts of the mechanism are attached to a separate wooden plank.
- The free end of the rod is attached to the frame in such a way that when the motor is turned on, it moves it forward and backward.
- The timer is connected to the motor and switch, and the plug is brought out (through a special hole in the box).
If the structure is constructed correctly, the following principles will be observed:
- the connecting rod mechanism is activated, which converts the circular movements of the rotor into reciprocating movements of the rod;
- thanks to the gear system, multiple revolutions of the rapidly rotating rotor turn into slow turns of the last gear, the duration of its rotation corresponds to the interval between turns of the eggs (4 hours);
- the rod should move the frame a distance equal to the diameter of the egg, which allows them to turn 180° to one side.
Read also: Postulates for successful propagation of cheflera at home
How is this mechanism supposed to work?
The mechanism works as follows:
- The motor rotor rotates at high speed.
- The gear system slows down the rotation.
- The rod connecting the frame to the last gear changes the circular motion to reciprocating.
- The frame moves in a horizontal plane.
- As the frame moves, it turns the contents of the tray 180° with a cycle of 4 hours.
Although the frame incubator has a very simple mechanism, thanks to automation it significantly saves time that would otherwise be spent on turning the material. The homemade design also allows you to save material resources that could be spent on purchasing a new automatic device, and the rotating mechanism helps to obtain a high percentage of chicks hatching.
How many times and how should you turn the eggs?
If the incubator is fully automated, then it has a corresponding function. Therefore, when using such a device, there is no need to monitor the frequency of this procedure. In a homemade incubator, it should be done manually.
You can watch this procedure in more detail in the video:
Next, people disagree on how often the eggs should be turned in the incubator in the future. As a rule, mechanical turning of eggs (chicken) should be carried out three or four times during the day, starting from the second day and ending on the eighteenth day of incubation. If you turn them over less often, the embryos will stick to their walls, and if you turn them over more often, they will become supercooled.
For geese, ducks and a number of other birds, there is a slightly different frequency for carrying out such an operation. The larger the eggs, the less often they should be turned. In order not to be mistaken about which direction this operation should be performed, they keep a special notebook. It notes the following parameters:
- temperature;
- air humidity;
- time of revolution;
- side of the egg (marked with a special mark).
It is recommended to turn it over during ventilation. Turn over very quickly to prevent cooling. In this case, it is necessary to maintain the temperature in the incubator in the range of at least 22-25°C. There is no need to carry out this procedure at night.
Turning is also affected by the location of the material in the incubator trays. If the eggs are in a vertical position, then they are tilted 45 degrees, first in one direction and then in the other. If they are located horizontally, the trays are turned over 180 degrees
What should you consider when creating an incubator?
The simplicity of the design does not mean that the requirements for it are minimal. Embryos and chicks require warmth, a certain temperature and humidity. Eggs must be turned regularly. Therefore, when studying the question of how to make an incubator with your own hands, you will have to carefully consider all the rules and necessary elements.
Optimal sizes
The parameters of the incubator depend on the tasks set by its owners. The dimensions of the structure can be affected by the selected heating system, as well as the materials from which the incubator will be created.
If we talk about a small farm, then in this case it is recommended to create devices with 80-100 cells. They can be used completely, or some can be left empty. Optimal cell sizes: diameter - 45 mm, height - at least 65 mm. When owners want to be able to breed several breeds of birds, they consider replacing the grille with a structure for larger (or smaller) eggs.
Heating and temperature control
Maintaining optimal temperature is the most important condition for breeding. Therefore, first, future authors need to correctly select heating devices. They can be placed around the perimeter of the chamber: both under the tray and above it. The requirement for the devices is uninterrupted operation and uniform heating of the mini-room.
The list of potential heating devices includes several candidates.
- Incandescent lamps. This is not the best option, because constant lighting for the incubator is not recommended. In addition, incandescent lamps cannot always guarantee uniform heating of the chamber.
- heating element. Electric heaters, on the contrary, will provide an ideal microclimate. However, these devices also have disadvantages: they are difficult to replace if the device unexpectedly fails, and the need to have a spare heating element in case of an emergency.
- Infrared heaters. This is the best, economical option. For incubators, infrared mats are used, which are fixed to the lid and floor of the chamber. They have no disadvantages and guarantee uniform heat distribution.
A relative disadvantage of the latest devices is the difficulty of replacing infrared heaters. It is recommended to invite a specialist for this operation. Therefore, when making a homemade device, they often choose not them or heating elements, but traditional incandescent lamps.
In a self-assembled incubator, low-power lamps are used, since the lower this parameter, the more evenly the heat will be distributed. These are 25, 40 W devices. For example, for a structure made to hatch 50 chicks, the total value should not exceed 80 W. The minimum distance from low-power lamps to trays is 150 mm, for 40 W devices - 250 mm. All sources must be evenly distributed throughout the chamber.
Strict adherence to temperature conditions is a must. Therefore, homemade incubators also require a thermostat and a temperature sensor (or several). The latter devices are placed as close as possible to the trays, ideally on them. In this case, a thermometer is an additional means of control. The best option would be an electronic device. It is installed above the trays. A conventional device is sometimes placed on a tray.
Ventilation features
Good ventilation is an essential necessity. It is this that ensures uniform heat distribution and constant air flow. In the absence of a ventilation system, the eggs will inevitably overheat and the embryos will die. The reason is a lack of oxygen, which enters through microscopic pores in the shell. There is an exception: these are small incubators designed for 50 eggs.
Ventilation can operate either continuously or periodically, but the first option is optimal, as it will make it possible to maintain a constant temperature and ensure a continuous flow of air. Incubators do not require a powerful device. A computer cooler with a diameter of at least 80 mm will be sufficient. To protect the blades of the device from fluff, it is recommended to install a mesh filter in front of it.
The recommended distance between lamps (25 W) and trays is at least 150 mm; the same distance must be maintained between adjacent grids. The gap between them and the walls is necessary for good ventilation. It should be 40-50 mm, no less. Holes for ventilation are made at the top (exhaust) and bottom (supply). Their diameter depends on the size of the device and can be 10-20 mm.
Egg turning: manual or automatic
For incubation to be successful, the eggs must be constantly turned, 180°. Under natural conditions, this is done by the laying hen; in artificial conditions, the change in position must be ensured by a person. Since manual operation takes a long time, rotary mechanisms are used. There are several devices:
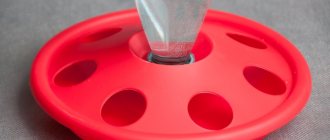
- mobile mesh;
- rotating rollers;
- trays tilting 45°.
The first option is a method suitable for small structures made of cardboard, foam or wood. The principle of operation of the device is quite simple: the mesh tray moves at low speed, so the eggs in its cells are forced to turn over. This process can be carried out manually - with a piece of wire tied to a mesh and pulled out. However, there is also the possibility of automating it.
Roller rotation is used extremely rarely for homemade incubators. The reason is the need for a large number of parts. In this case, turning over is guaranteed by rollers covered with a mosquito net. To ensure that the eggs remain in their places, a wooden grid-tray with sides 700-800 mm high is created. When the ribbon starts moving, the future chicks turn over.
Tilt trays are used for large incubators: for example, for structures made from old refrigerators. In this case, the best solution is automatic devices, rotary trays, consisting of a certain number of small elements. The rotation of each of them can be adjusted separately. Such kits include a motor and a power supply.
Rules for making an incubator
Despite the simplicity and modest size of the design, future creators need to provide for everything. Therefore, before making an incubator, they need to become familiar with several rules for creating a bird “maternity ward”.
- Materials for the incubator must be dry, free of dirt, paint, grease stains, etc. There should not be the slightest trace of mold on them.
- During assembly, maximum attention should be paid to areas of potential heat leakage. All gaps between the walls must be sealed with sealant.
- To ensure the required level of humidity, the incubator provides space for installing a container of water.
- Supply openings are usually made in the lower part of the apparatus, exhaust openings in the upper part of the structure.
To be able to control the incubation process, it is necessary to arrange a viewing window: for example, in the lid or in one of the walls. Thermostat, temperature sensor, thermometer and hygrometer are mandatory devices. Otherwise, you won’t have to count on a small number of livestock.
When do you no longer need to turn eggs?
Experts note that it is necessary to turn chicken eggs in an incubator only from the moment the chickens first squeak until the time they begin to peck. When the time to peck comes, they should be laid on their side, and then the ventilation should be turned on at full power. If a loud squeak of the chicks is heard, this will indicate a sufficiently low temperature for them.
The need to maintain the prescribed temperature affects the rate of healthy chicks emerging. If the temperature for the chicks is acceptable, then they will not squeak too loudly. The following parameters are optimal for chicks during this period of time:
Turning eggs in an incubator: advice from poultry farmers
Anyone familiar with hatching eggs from ducklings, chicks, goslings and other types of poultry knows that eggs placed in a manual or automatic incubator must be turned. The time they spend there depends on what kind of bird you want to hatch. The frequency of revolutions varies - some change positions no more than 2 times, others much more often. This again depends on the type of bird.
Why is a revolution needed? Why is it necessary to change the position of the eggs and how often to do this? How do humidity and temperature affect embryo development? These are important questions that any poultry farmer should know the answers to.
How many times should you turn?
Chicken eggs are placed in an incubator for 20-22 days. It is recommended to change their position two to four times a day (do not do this at night). Many farmers advise turning over only twice - in the morning and in the evening, while others are sure that turning over is necessary at least 4 times. If you do this less often, the fruit may stick to the shell, and if you do it too often, it may become hypothermic. It is best to turn them over while airing. If your incubator does not provide automatic turning, the eggs should be turned 2 times a day on the first day (doing this quickly and very carefully), always at the same interval of time. Starting from the second day, you should not turn over more than once every 8 hours (at an angle of 180 degrees).
Temperature
The embryo can develop at a temperature within 27-43 degrees:
1. If the temperature is too low, it develops very slowly, incubation is delayed, and as a result the chicken dies.
2. The chicken cannot withstand high temperatures of 41-43 degrees for long - only in the first few minutes after the start of incubation, the material can be placed in an incubator heated to 47 degrees, without any harm to the embryo. 3. The maximum temperatures at which the embryo develops without pathologies is 37-40 degrees.
4. If heating occurs evenly throughout the incubator, the upper temperature limit should be no more than 38.5 degrees, but, oddly enough, the closer the temperature is to the upper limit, the faster the embryo develops. 5. In the period from 12 hours to 5 days, high heating rates can cause deformities in the chicks. 6. Periodic cooling has a beneficial effect on the development of the future chick.
Humidity in the incubator
Humidity plays an important role in the development of chicks, so nowadays you can see incubators on the market that have a humidity meter (for a homemade incubator, you can use a regular hygrometer). Firstly, heating depends on humidity, and secondly, the evaporation of water by the incubation material. You need to pay attention, first of all, to relative humidity. It is also recommended to moisten the eggs while turning them with a solution of potassium permanganate.
At the beginning of incubation, the incubator should have high humidity, which later decreases slightly. But too high and too low humidity are contraindicated, as they negatively affect the life of the eggs. The most favorable humidity is considered to be 50-60%. During the hatching period, it rises to 65-70.
Preparing for work
First of all, you need to calculate the required area. A medium-sized tray (450*350 mm) can hold the following number of eggs:
- goose – 40;
- turkey or duck - 55;
- chicken - 70;
- for quails – 200.
More often, an incubator is made for chicken eggs. There is a separate table for tray sizes for them:
| eggs | Tray dimensions |
| 45 | 45x25x28 |
| 70 | 55x55x28 |
| 100 | 60x60x28 |
Cells for chicken eggs should have a depth of 60-80 mm and a radius of 22 mm.
Of course, these are approximate figures. The exact number depends on how tightly packed the eggs are and what size they are. Therefore, when drawing a diagram of an incubator with your own hands, you need to take into account the approximate number of eggs, and not the exact one. However, in most cases, when making an incubator, you have to use the materials that are at hand.
In addition, the camera has several more requirements:
- The housing must be dry and clean. The surface should not be covered with dyes, grease or mold.
- The chamber must be assembled in such a way that heat does not leak out of it in the future. For this, a sealant is used.
- Calculate the free space for the water bath in advance so that the required humidity is maintained in the chamber.
- You will need to make several holes in the housing for air ventilation.
To create a homemade incubator with your own hands, you will need the following components:
- materials for the camera: refrigerator, sheets of cardboard, plywood, foam plastic;
- egg trays;
- incandescent lamps with a power of 25-40 W. A small device will need 2-3 pieces, and a refrigerator will need 4-6;
- thermometer;
- fan;
- hygrometer;
- To automatically turn eggs you will need a thermostat, a timer for turning, a gear motor, bearings with clamps;
- installation tools: pliers, saw, knife, electrical tape, jigsaw;
- sealant.
When do eggs no longer need to be turned?
In the period from the first squeak to the hatching, the eggs stop turning over altogether, laying them on their sides and turning on the ventilation to the highest level. If you hear a chick's plaintive and demanding squeak, he is most likely cold. In good conditions, chicks squeak quietly before hatching. Some farmers claim that from the 12th day of incubation the eggs do not need to be turned - this is due to the peculiarities of the structure and development of the embryo. So, during the first 11-12 days of incubation, the vascular network inside the egg, called alatois, closes. Therefore, during the first 12 days it is recommended to turn the egg so that it does not dry out, and therefore the humidity in the incubator during these days needs to be increased. Once the alatois is closed, there is no longer any danger of drying out.
What to do if the egg shell is cracked?
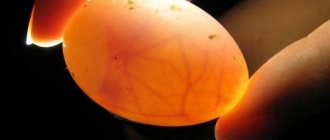
Before laying the material, you need to carefully inspect it for cracks, scratches, dirt and other defects that could harm the embryos. There are also cases when, upon examination, an egg is discovered that is cracked.
If this happened in the early stages of incubation, then it is advisable to remove it immediately. This is due to the fact that the embryo in it will most likely die. Cracked eggs are negatively affected by the environment.
We do not recommend sealing damaged shells with various materials (adhesive tape, etc.). It is advisable to switch to such measures in the later stages of incubation (and then at your own peril and risk), when the chicken is already fully formed.
The use of safe materials that are applied to the crack allows you to protect the chick from environmental influences. In many cases, cracked eggs produced viable chicks.
Read also: Dioscorea Caucasica: benefits, harm and indications for use