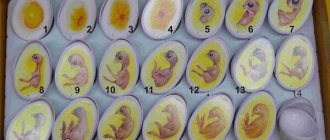
Ovoscopy of turkey eggs by day
During the ripening process, the fruit goes through 4 stages, at each of which it should be carefully examined.
If during incubation deviations in the development of the embryo are noticed, the incubation conditions are changed. Did you know? Despite the fact that the ostrich lays the largest eggs in the bird world, compared to the size of the ostrich itself, they are the smallest. But the largest eggs relative to the size of the bird are laid by the kiwi.
First ovoscopy (8th day)
On the 8th day after laying the eggs in the incubator, the first candling is carried out, which will help remove potentially useless material.
At this stage, the silhouette of the embryo is already visible and its circulatory system is visible. If fertilization does not occur, then the yolk looks like a dark spot, and the circulatory system is either not visible or is absent altogether.
If the shell is accidentally damaged during the examination, it can be carefully sealed with tape or adhesive tape.
Second ovoscopy (13–14th day)
An equally important stage in fetal development takes place from the 8th to the 14th day. On the 13th–14th day, a significant event occurs - the allantois closes. With the help of this organ, the fetus is able to consume air from the environment.
Important! Poultry reference books recommend ovoscoping only on the 8th and 25th days of laying.
On day 14, the eggs can be illuminated to assess fetal development. When transilluminated, the fruit will look like a dark spot on which the vascular network will be clearly visible. If the circulatory system is not visible, and the fetus is not attached and moves freely, then the embryo has died.
Third ovoscopy (25th day)
At the last stage, significant changes are observed in the metabolism of the fetus - its own temperature appears. It is during this period that ventilation is especially carefully monitored to avoid overheating of the eggs.
Around the 25th day, pecking begins, so the final ovoscoping should be carried out and the viability of future poults should be checked.
When canned, the eggs should be completely dark, almost to the edges of the air chamber. Only the camera will be visible. It is this situation that indicates that the embryo is alive and healthy.
Hatching chicks
Turkey chicks hatch on the 26th–28th day.
As soon as biting begins, the temperature in the incubator should be set at +37 °C, and the humidity at 65–70%. The hatching of chicks will begin on the 27th day, towards evening, and will end on the 28th. In total, the process takes more than 10 hours.
The incubator cannot be opened during hatching of turkey chicks - wet chicks may become hypothermic. They are removed from the device only after they are all completely dry.
However, it is too early to relax. The first day after hatching is very important for the life of the chicks. When the turkey poults are taken out of the incubator, they need to create a suitable microclimate. The chicks should be placed in a clean box, the bottom of which should be covered with cloth.
Did you know? Many poultry farmers predict the weather based on turkeys: before the weather changes for the worse, these birds begin to pluck themselves.
Some farmers recommend placing a heating pad underneath. In the room where the turkey poults will be kept, the temperature must be maintained at +35 °C. If the chicks are cold, they begin to huddle in groups and refuse to approach food.
When the turkey poults eat, on the contrary, it is hot, they lie down on the floor and open their wings.
As you can see, ovoscoping is an important stage in the incubation of turkey eggs. Compliance with all recommendations will help you choose high-quality incubation material, monitor the maturation of eggs at all stages of development and increase the hatchability of turkey poults to 100%.
How to perform ovoscopy?
This device has a special hole into which you need to place eggs.
In this way, they are scanned and it becomes clear whether there is an embryo. Before starting the procedure, it is recommended to wash your hands thoroughly or wear thin rubber gloves. It should be noted that lowering the temperature of the egg in the early stages of embryo development is fraught with its death. Therefore, the room where the ovoscope test is carried out must be warm. The whole procedure must happen quickly. It is optimal if there is an assistant present who will serve the eggs and place them in place in the incubator or nest after candling. Eggs should be checked for the presence of an embryo no earlier than 5-6 days after the start of incubation. Until this time it will not give any results.
If candling shows that under the shell there is a clearly visible darkish spot or area of the yolk with streaks of thin blood vessels, then there is life in the egg. The embryo is especially noticeable if it is located close to the shell. Its insufficient immersion in the yolk indicates that the development of the chicken leaves much to be desired.
Formation of the embryo by day
Photo:
During the first ovoscopy, when transilluminated, practically nothing is visible except the yolk and the condition of the shell.
With each viewing, more and more elements become visible every day:
- Until day 3, nothing is visible inside the egg. A homogeneous liquid without clots or defects is visible.
- In the period from 3 to 6 days, the circulatory system is formed, strings of blood vessels are visible leading to the center of the egg to the embryo.
- A week after the egg appears, the embryo occupies a third of the entire shell.
- By the end of the second week, the embryo changes location, moving to the lower part of the egg.
- From the second week, the embryo begins to grow rapidly. By the end of 18 days, the embryo occupies the entire surface of the shell.
Features of incubating turkey eggs
The incubation period is quite difficult: you must always monitor future turkey poults and provide certain conditions for their maturation. Thus, the temperature in the incubation station should be maintained at +38 °C for the first 7 days, and the humidity should be 70–80% (from the 17th day it can be reduced to 50%).
Read the rules for raising turkey poults in an incubator and the table for incubating turkey eggs at home.
Since eggs absorb a lot of oxygen during incubation, good air exchange should be provided for them. In addition, on the 15th–25th day, the material begins to be cooled for 30–40 minutes per day.
What is the difference between eggs without a rooster and with a rooster?
Fertilized eggs vs. unfertilized eggs.
If a laying hen is in a herd with a rooster, the eggs can be fertilized. Chicken eggs can be eaten regardless of whether they are fertilized or not. Every day you collect eggs, the hen does not warm them - there is no chance of finding a chick that has begun to develop in the egg.
Although there are minor differences between fertilized and unfertilized eggs. There is no difference in the taste, texture or nutrient content of an egg. It depends solely on the feeding! But many experienced poultry farmers claim that a fertilized egg contains special energy from Mother Nature . Therefore, eggs from laying hens living with a rooster are considered more valuable!
In order for a chick embryo to develop into a chick, the egg must be heated for 21 days. The hen incubates the chicks by sitting on the eggs. If laying hens lack the brooding instinct, the eggs can be placed in an incubator for 21 days.
If fertilized eggs are collected soon after laying and stored in a cool place, the embryo will not mature. Some breeds of chickens have a strong maternal instinct, and there are also those that never sit on eggs. By the way, if one laying hen sits on eggs, other hens can also “catch the infection” and all will sit down to hatch the chickens. Therefore, the hen is either driven from the nest or hidden from the eyes of other hens.
You can use an ovoscope to see whether an egg is fertilized or not. But at home you can accurately determine it only after 3-1 days of warming up. Shine through with a flashlight from your mobile phone, it’s convenient and always at hand.
Features of determining sex by age
It is possible to distinguish chickens by sex almost from their very birth, not to mention the age when they are covered with feathers and are already feeding on their own. There are many methods and techniques for correctly determining the sex of a future bird. Some of them are almost 100% reliable, while others are traditional methods. In order to be sure of the result you get, you need to use several methods.
It is during this period of the chick’s life that the Japanese method, which has high accuracy, is carried out. Read about it below.
A little later, at about the age of two or three days, in future cockerels you can notice a difference in the color of the feathers on the wings. They are lighter in color than in laying hens. On the third day after hatching, this difference in colors no longer becomes so noticeable. When the chicks are already 2 weeks old, you can find out the sex by their tail.
When the chickens are already 1.5 months old, the cockerels can be distinguished by their combs and beards. The beard of males has a yellow tint. Later they can be distinguished by their more massive and longer legs than those of laying hens. Each of these changes depends on the number of weeks that have passed since the chicks hatched, and they can be observed up to 2.5 months.
At the age of three months, young bettas develop spurs and their combs are bright red. The combs of females are yellow and small in size. At the age of 4 months, the differences between males and females become obvious.
It is worth noting that in general, males are slightly larger than females from the first day of life. They have more powerful and longer legs, they are much more active and even aggressive. In roosters during short periods of life this difference is small, but over time it increases more and more. There are several known ways to determine the sex of a future individual, also from an egg.
- The egg is picked up and examined carefully. The egg, which has a round shape, “carries” the female. An egg with a more angular and elongated end is a male egg.
- In eggs with a smooth elongated end there lives a laying hen, and in eggs with a tubercled end - a cockerel.
- For the next method you will need a flashlight. It is necessary to enlighten the egg, moving from the sharp end to the blunt end, and find the air pocket. If it is located in the middle of the egg, then usually the embryo inside is male. If it is shifted to either side, then most likely it is a female. For convenience, an ovoscope is increasingly used today when carrying out this method. The eggs should be placed on it in such a way that the light comes from the sharp end to the blunt end. Next, by analogy, you need to try to detect an air pocket and follow the algorithm already described above.
The subtleties of determining the sex of a chicken in the video below.
Daily age
Experienced farmers will tell you how to distinguish a rooster from a hen soon after they hatch. But for reliability, it is better to use several methods simultaneously.
Day-old babies have not yet sufficiently developed the characteristics that distinguish boys and girls from each other.
You need to pay attention to the fluff of day-old chicks. In boys it is lighter and darkens only after a few days
By week
At 3-4 weeks of life, more striking signs appear by which the sex of chickens can be recognized:
- males are ahead of females in development and are actively gaining weight;
- boys begin to show aggression and may fight over food or a more convenient place;
- in hens, the layer of down changes faster, and by 3 weeks plumage appears (roosters at this age can walk without feathers).
The above signs are reliable and in most cases tell you how to distinguish chickens by gender. But it is necessary to take into account the developmental characteristics of children in accordance with their breed.
By month
With age, the differences become more pronounced. Therefore, even novice farmers understand how to distinguish between hens and roosters.
At 1.5-2.5 months, roosters grow a scarlet comb and beard. The comb also appears in chickens, but it is yellow and smaller.
Roosters differ from chickens in the shape of their faces. It is rounder and has less feathered skin that is red in color.
At three months, you can identify chicks by sex by looking at their feet. Roosters develop spurs.
The changes also apply to the tail. By this age, boys can boast of a large and proudly raised tail.
The weight advantage of roosters also becomes clear.
Six months old
At the age of 6 months, hens develop a sign that can become the main one in determining sex. It's time for the first laying.
Roosters begin to crow loudly in the morning. They become more aggressive and can even attack the owner, defending their territory.
The tail of males is overgrown with long feathers. Its color is brighter than that of chickens.
Structure of the fertilized egg
The fertilized egg begins to develop immediately after fertilization of the egg: the cells begin to divide. You can see pictures of the fertilized egg already in the third week of your missed period. When the diameter of the fertilized egg is 2 mm, then you can think about pregnancy for four weeks. If the fertilized egg is 4 mm in diameter, they say that the gestation period is very short, no more than five weeks. When using a transvaginal sensor, it is visualized earlier.
The fertilized egg moves from the abdominal cavity to the uterus. Her journey lasts from one week to ten days. During its movement, the process of cell division continues. When the fertilized egg reaches the uterus, it will contain 32 cells. It needs nutrients and oxygen for normal development, so the egg is covered with chorion on top. Its surface secretes special enzymes that dissolve the uterine mucosa. On the entire surface of the egg there are villi with which it is connected to the uterus. Subsequently, they are present only at the site of attachment of the egg to the wall of the uterus. Twenty days after the last menstruation, the yolk sac can be seen on ultrasound. It provides the embryo with vital substances. Its presence does not guarantee that the pregnancy is developing normally, however, in the absence of a yolk sac, it is worth considering that in this case there are problems with the development of the fetus. If the fertilized egg does not enter the uterus, pregnancy will not occur.
At the sixth week of pregnancy, a strip about five centimeters long is already clearly visible in the fertilized egg. This is an embryo. The fetal heartbeat can also be seen at this stage. The baby's heart beats at a rate of 220-240 beats per minute. Cells begin to differentiate, they determine which will be responsible for what in the future. The embryo develops a neural tube.
It separates from the fertilized egg, and parts of the body can already be distinguished in it: arms, legs and head. The umbilical cord is also visible in the picture of the fertilized egg.
After the fertilized egg has penetrated the uterine cavity, it must implant itself against its wall, that is, the stage of nidation begins. How it attaches depends on the development of the villi. The villi develop well when the egg moves at a normal speed and the chorion has fully developed. In case of underdevelopment of the chorionic layer, the fertilized egg cannot attach to the uterus and the risk of a miscarriage increases.
Stages of ovoscopy. When to check
Ovoscopy increases the number of healthy chicks hatched. A total of 4 checks are required over the entire incubation period.
– it is important to do the first check on day 4-5. In high-quality material you can see the air chamber, yolk and white
You can already see the formation of the embryo and its blood vessels. – the next check must be done 5 days after the previous one. We determine the condition of the fetus. If no changes have occurred, then it is considered not fertilized and must be removed from the bookmark. When the embryo develops properly, it should occupy the entire surface of the shell. The chick's blood vessels should be visible. – after 5 days a third check is carried out. It falls on the 11th day. The outlines of the embryo are already visible. The air chamber should increase 3-4 times. The vascular network should grow to cover the entire shell. – we do the fourth check two days before removing from the incubator. We determine whether the chick is ready to be born or not.
Sampling is important in order to weed out low-quality material and identify various pathologies that cannot be determined during a normal visual examination.
An ovoscope is an electrical device that allows farmers and private farm owners involved in poultry breeding to control the quality of incubation material.
The device helps to discard eggs that will not hatch into chicks, and subsequently monitor the development of embryos step by step. There are various models of ovoscopes on sale; the design is easy to make with your own hands.
Determination using cardboard
If you don’t have an ovoscope, at home you can use ordinary cardboard, twisted into a tube 2-3 cm thick. One end is brought to the light, then to the object under study. The contents are viewed through the second end. On the 4th-5th day of fertilization, a darkened area the size of a match head is visible in the egg. When turning, the speck moves behind the yolk. It resembles the letter "O".
If the spot is completely dark, this indicates that the egg has not been fertilized and is not suitable for breeding chickens. With this method of determining a fertilized egg, the level of development of the germinal disc in the yolk is important. The viability of the disk will be indicated by a change in the volume of air in the egg chamber.
When to shine? Ovoscopy procedure by day
Carrying out the procedure of candling eggs every day is a common mistake of novice poultry farmers.
This check is not recommended for 3 reasons:
- Professionals who use brood hens to raise chicks are putting birds at risk. Separation from hatching eggs is difficult for birds. Constant stress is harmful to the hen.
- It is not advisable to touch eggs often. At first they are very fragile. Mechanical small cracks are guaranteed to appear on the egg, rendering it unusable.
- Embryos have weak immunity. Constant temperature changes negatively affect the condition and development of the embryo.
The duration of the procedure should not exceed 5 minutes. The choice of room falls on a warm, secluded place.
First candling procedure
The question of time and frequency of the procedure is always relevant. Ovoscopy is performed several times at different stages of embryo development. When embryos appear, it is not advisable to immediately place them in the incubator. Some eggs are rejected empty or damaged.
Before laying, the first enlightenment procedure is carried out.
At first, practically nothing will be visible inside the egg.
The product is tested for:
- keeping the embryo inside;
- absence of cracks and microcracks.
Experienced poultry farmers first pay attention to the egg shell. This is a shell that protects the young embryo from external environmental influences.
The presence of spots, small cracks, unevenness, and roughness indicates that the egg is unsuitable for incubation.
The second important factor is the condition of the yolk. There is an embryo in that area. It is necessary to enlighten the yolk well. A high-quality egg contains a clearly defined spot located in the middle of the shell. When its own axis rotates, the yolk changes position slowly without changing shape.
Finally, attention is concentrated on the general condition of the liquid inside the shell. High-quality consistency, liquid and transparent
The presence of clots, foreign bodies and other roughness indicates the unsuitability of the embryo.
At the top of a healthy egg there is a small air bubble - a puga.
The second procedure for candling chicken eggs
The second egg candling procedure is carried out on the 11th day of embryo development. It is necessary to check the condition of the respiratory system of the future chick - allantois.
A healthy respiratory system is located at the tip of the egg. It fits tightly to the shell and looks like a single spot. Damaged airways and blood vessels can be saved. Proper nutrition must be provided.
The third procedure for candling chicken eggs
The third procedure for candling eggs is carried out on the 18th day of embryo development. This is the last ovoscopy for future chicks. A final check is made to ensure the chick is ready to be born. There are no pathologies if there is no lumen at the end of the egg.
Damaged eggs are not thrown away. They are sent to the middle row of the incubator.
Calculate the percentage
By figuring out how to determine fertilized chicken eggs by autopsy, you won’t be able to get offspring from them, but you can determine the percentage of fertilized eggs.
Expert advice
Viktor Nikolaevich Travnikov
For about 20 years he has been breeding laying hens, broilers, geese, ducks and other poultry. Our expert who is always happy to help readers.
Ask a Question
If out of five opened eggs four are fertilized, then you can virtually calculate that the result is 80%. Opened eggs can be used for food purposes. It should be noted that the more eggs are opened, the smaller the determination error will be.
Knowing the percentage of fertilized eggs in the incubator, you can plan further actions to accept and settle the hatched
young animals, as well as fussing and changing the rooster.
If the percentage of fertilized eggs is high, this does not mean that the yield of chicks will be high. From the period of fertilization to the moment of hatching, many factors influence the egg:
- genetic composition of the egg;
- biochemical composition of the egg;
- temperature before and during incubation;
- humidity;
- air speed;
- the period from laying to the start of incubation.
Of course, no matter what the conditions, an empty egg will not produce a chicken. In matters of poultry farming and incubation, there is not a single point that can be neglected. Attentive attitude and a balanced diet of the breeding stock will allow you to get a high percentage of fertilized eggs and a high yield of healthy young animals.
Useful information
Not really
Like the author!15
- Even more interesting:
- Proper storage of eggs for incubation
- Correct placement of eggs in the incubator
- Ovoscopy of eggs: what is it and how to do it correctly
Discussion: 2 comments
- Sasha:
12/12/2018 at 10:28When I decided to start breeding chickens, I couldn’t imagine how difficult and painstaking it is and what knowledge you need to have to get a good result. Of course, I came across the definition of fertilized eggs. I couldn’t figure out what was what and ended up using the incubation method.
Answer
- 555:
02/11/2019 at 12:17
How long does it take for a fertilized egg to be visible through an avoscope?
Answer
Incorrect artificial insemination.
The use of the method of artificial insemination of birds allows us to avoid many reasons for the decrease in egg fertilization, especially in birds with pronounced sexual dimorphism in body weight.
Artificial insemination of birds makes it possible to obtain from one male 5 - 10 times more offspring than with natural mating, increases the sexual load on producers through the use of sperm dilution and dividing the resulting ejaculates into a large number of sperm doses, makes it possible to reduce the number of males by 4 - 7 times , which allows you to reduce the cost of their maintenance. But you need to select the right thinners...
The article “Review of hormone-stimulating drugs for poultry farming” examines the influence of various additives in chicken nutrition and their impact
Ovoscoping chicken eggs for the first time
Many inexperienced poultry farmers are wondering about the timing of ovoscopy. The procedure is done several times at different stages of embryo development. Since not all eggs reach fertilization, a first ovoscoping should be performed before sending samples to the incubator.
During the preliminary examination of eggs using an ovoscope, the presence of an embryo and the absence of cracks in the shell are revealed.
Particular attention should be paid to the shell: a high-quality object has a smooth coating without roughness, protrusions, pits and stains. If at least one of the listed defects is present, the egg is considered unsuitable
Also, during the first procedure, it is necessary to carefully examine the yolk, since it is from this part that the embryo is formed. When a suitable egg is clarified, it is clear that the yolk has clear contours and is located in the center of the shell. By rotating the egg, you can observe how the yolk very slowly changes its position.
During the first ovoscopy, pay attention to the yolk and the position of the air chamber. The requirements for the general contents of the egg cannot be neglected.
In the upper corner of the shell there should be an air chamber - the so-called puga. The liquid inside the object should be homogeneous and moderately transparent. If there are foreign objects, clots or any formations, the egg must not be placed in the incubator.
The requirements for the general contents of the egg should not be neglected. In the upper corner of the shell there should be an air chamber - the so-called puga. The liquid inside the object should be homogeneous and moderately transparent. If there are foreign objects, clots or any formations, the egg must not be placed in the incubator.
How can you tell if an egg is fertilized?
When faced with the task of breeding chickens, it is important to determine whether the chicken's egg is fertilized or not. It may happen that some eggs placed under a chicken will not hatch into chicks.
This is due to the fact that there is no embryo in them, that is, they are not fertilized and there is no hope of obtaining offspring. The fact is that hens lay eggs in any case whether there is a rooster or not. But they reproduce only in the presence of a rooster.
A fertilized egg can be determined by the presence of a small amount of blood in the yolk. In order to illuminate and determine fertilization, you can use ordinary light from a lamp or purchase a special device - an ovoscope (you can see what it looks like in the photo). You can also make it yourself if you cannot purchase the device.
The transillumination device must be taken to a dark place. The egg should be placed with the thick end towards the light, then tilted to get a good look at what’s inside. Brown eggs are the most difficult to enlighten, so it is better to choose white eggs for placing under the chicken. There is no need to look at the contents for a long time: thanks to the bright light, identifying the embryo will not be difficult. In order to imagine the entire candling process, you can watch a video on the Internet on this topic.
A small area with blood vessels is visible in the light of a fertilized egg. If, when the inside is scanned, no black spots or blood clots are observed, then this is an unfertilized egg and is not suitable for hatching. Sometimes it happens that it is impossible to detect a clot in the yolk, but a blood outline is visible along the edge of the yolk, and there are no spots in the center. This suggests that the egg was fertilized and the embryo began to develop, but for some reason it died. Such a specimen should be thrown away immediately; a chicken will not hatch from it.
How to determine the fertilization of a hatching egg
During incubation, fertility problems are usually first identified during candling, when the number of empty eggs is higher than expected. To determine the time and cause of death of the embryo, the hatchery manager can analyze the preserved egg. However, if candling is carried out during transfer, on the 18th day, which often happens, it is not easy to distinguish between an initially empty egg and an egg with an embryo that died before the appearance of the blood ring. The reason is that the membrane of the dead embryo degenerates while the egg is still in the incubator.
If candling is carried out on days 7-10, you can reliably determine which egg did not contain an embryo and which one died. First, the embryonic membranes that form during the first days of incubation are still visible. Secondly, in a transparent egg taken on days 7-10, you can notice a change in the color of the yolk as a result of the vital activity of the embryo. During embryonic activity, water exchange occurs between the albumen and the yolk, resulting in the formation of a whitish or light yellow ring around the embryo.
A fertilized, unincubated egg contains an embryo (germinal disc or blastoderm) that develops from a fertilized egg (zygote) as the egg forms in the oviduct. An egg is a female gamete that floats on the surface of the yolk. When the yolk enters the oviduct, sperm (male gametes) penetrate the yolk membrane, after which only one sperm fuses with the egg to form a fertilized zygote. Then, when the egg is formed in the oviduct, the zygote develops into a blastoderm with a clearly visible Transparent Area (PO) surrounded by an Opaque Area (OA) (Figure 1a). However, if for some reason the sperm does not reach the egg, the egg remains unfertilized and the egg degenerates into a small infertile disc. A sterile disc appears as a small white dot with jagged edges. If the hatching egg is inspected upon arrival, before incubation begins, any problems with infertility can be immediately discussed with the parent farm.
Recommendations
- Candle the egg regularly during transfer (on day 18).
- If the number of empty eggs exceeds the acceptable or standard value, test the egg to differentiate between an unfertilized egg and early embryonic death.
- For the most reliable determination of fertilization, a mirage can be performed on days 7-10.
- Examine a minimum of 10 fresh, unincubated eggs regularly when there are problems with fertility.
- If the number of unfertilized eggs is too high, discuss the issue of keeping birds of both sexes with management of the parent farm.
- If the rate of embryonic mortality before the blood ring stage is too high, reconsider egg storage and transport conditions and ensure that the setter heats the egg to incubation temperature quickly and smoothly without failure.
Figure 1a - Fertilized gamete Figure 1b - Unfertilized gamete
Pictures published with permission of the publisher Optimizing Chick Production in Broiler Breeders, by Robinson FE, Fasenko GM and Renema RA. Volume 1: Broiler breeder production series, Spotted Cow Press, Alberta, Canada.
The appearance of the egg
- The genitals of an animal contain many eggs that are at different stages of maturation. Each of them is placed in a follicle, from which the finished egg moves into the oviduct. Thus, the first stage of egg formation is the maturation of the egg.
- The egg travels through the genital tract, and this takes approximately 20 hours. During this time, the egg forms the protein, shell and other membranes.
- It takes about 30-40 minutes for the egg to move into the esophagus. If two eggs enter the birth canal at once, the egg will have two yolks. It happens that the second yolk comes out with a delay, so the first egg will have a shell, but the second will not.
- If the egg is fertilized, a small white spot approximately 3-4 millimeters in size (germinal disc) appears on the surface of the yolk.
Fertilized chicken cell
Do chickens lay eggs without a rooster?
The natural characteristic of laying hens is their ability to produce eggs regardless of the presence or absence of a rooster in the house. The body of laying hens contains an ovipositor that functions independently. It forms the yolk, which is covered with white and shell, moving through the sections of the ovipositor without an embryo. Of course, such eggs differ in structure from fertilized ones, but the taste will remain unchanged. Some inexperienced farmers are sure that the fertilized yolk has a richer color, but this is not the case. Color saturation only reflects the diet of the laying hen and its habitat.
Does a hen lay eggs without a rooster?
Why is there a rooster in the chicken coop?
Even though the male is not involved in the egg production process, he plays an important role on the farm. The presence of a rooster ensures high productivity of laying hens. If there was no rooster in the house before, when one appears, the hen begins to lay eggs less often, but after a few days everything returns to normal, and the productivity of the hens increases. In the presence of a rooster, hens behave quieter and calmer, do not fight or become aggressive. A correctly chosen rooster is the owner of the poultry house and will protect the family from other animals and other enemies.
The rooster is an essential element of a productive laying hen flock.
Eggs without shell
If a young hen lays small eggs or products consisting only of protein, this is completely natural. Poultry farmers define such eggs as fat eggs - they are formed when a protein clot appears in the oviduct, enveloped by a shell. But what to do if an adult hen produces eggs in film, without shells? Most often, this occurs due to a lack of elements in the laying hen’s body that are essential for life: calcium and phosphorus.
Egg without shell
Disorders can occur due to stress and during a viral infection. To ensure that the eggs are strong and healthy, that there are no bloody spots in them, and that the shell does not break before the time necessary for the formation of high-quality products, do not allow disturbances in the hormonal system of domestic chickens. Provide your birds with the right diet, plenty of space, and care for them carefully.
Fertilized or unfertilized?
A freshly laid egg is exposed to other risks: the conditions in which it cools from the hen's body temperature to the environmental conditions in the nest, the time this process takes, mechanical factors, chemicals, infections and even disinfection are all obstacles that must be overcome. After this comes storage, transportation and the start of incubation. Processes that do not always contribute to survival.
All these types of early death are almost impossible to determine using the standard industrial method - candling. As a consequence, the category of “empty” egg contains both the actual infertility and the stage of early embryonic death. The only way to distinguish between a true infertility and an early death is to analyze the opened egg. However, for accurate diagnosis and selection of the right solution, it is important to distinguish between these two groups.
The presence of a tiny ring on the surface of the yolk with a diameter of only 3-4 mm, visible immediately after the egg is laid, allows the egg to be classified as fertilized. The embryo continues to develop as the egg cools. During the optimal cooling time (6 hours), it grows to a diameter of about 5 mm and becomes storage stable. This is stage XII-XIII, when the ring is still small and its center is clearly yellow. The color of the yolk surrounding the embryo remains unchanged. Too slow cooling or high storage or transportation temperatures cause more intensive embryo development. An increase in the diameter of the ring, the center is filled with white specks and the pale zone of the yolk means further development and absorption of water from the white. These embryos have developed to a stage that is resistant to storage, and the embryo will most likely die at the low temperatures used during storage.
Life goes on, and the beginning of incubation brings with it further changes. After 24 hours, the pale yolk zone surrounds the embryo. After 48 hours, this area enlarges and a small island of blood vessels can be seen with a magnifying glass or under a microscope. By 60 hours, the vessels are already developed, and the blood ring can be seen with the naked eye. Vascular development is a reliable indicator of egg fertilization. Be careful: traces of blood in an unincubated egg are not always an indicator of viability. Meat or blood inclusions released in a chicken's oviduct can sometimes be found even in a table egg.
Analysis of the "empty" egg. carried out after the mirage on days 7-10, provides reliable information. Earlier candling does not make sense. Changes in yolk color or cloudy yolk in an "empty" egg can be interpreted as death at a very early stage. In more advanced phases like “blood ring” or “black eye” there is no longer any doubt. If the opened egg is analyzed later, for example during transfer, indicators of very early mortality are less visible. and errors are more likely because the vitelline membrane becomes weak and easily destroyed.
Recommendations:
- Practice the difference between a "fertilized and unfertilized" egg with a fresh egg that has not yet been incubated.
- Check embryonic stage by measuring the diameter and appearance of the egg upon arrival. Use this information when making decisions about refrigeration, on-site storage, and transportation.
- If the percentage of “empty” eggs is questionable. postpone the mirage for 7-10 days to clarify the situation.
When and how to properly check eggs for embryos
There is no need to candling eggs daily; this can negatively affect the formation of the embryo, especially at an early stage, when prolonged hypothermia is undesirable.
There is no need to candling eggs daily
If a hen is used for hatching, constant disturbance will cause stress in the bird and it may abandon the nest.
The ovoscopy scheme includes 4 stages:
- It is carried out no earlier than the 4-5th day after demolition for the purpose of placing it in the incubator. A fresh specimen should have a smooth shell, a small air chamber, which is located in the blunt part of the egg. The yolk is smooth with blurred boundaries, located in the center or closer to the air chamber, when turning the egg it rotates slowly, there are no foreign inclusions.
- The growth of the circulatory system network and the shadow of the embryo during movement are observed.
- During this period, blood vessels are clearly visible, the embryonic membrane (allantois), which serves as the respiratory organ of the embryo, lines the entire inner surface of the shell. The fruit is enlarged and is clearly visible.
- Carried out at the end of incubation, the living fetus occupies the entire cavity, the movements and outlines of the embryo differ.
How is it carried out?
Previously, instead of a special device - an ovoscope, a candle was used.
Now to examine the contents of the egg you will need a device and a special grid. It is placed on the grill, and then shined through by placing the device under it. The method is simple, but with its help you can control the process of incubation development of poultry. If there is no money for a special device, you can track incubation development in a different way. To do this, you will need an ordinary cardboard box and a light source - an incandescent lamp with a power of more than one hundred watts.
Not all breeders use a reflector, but placing it under a lamp also helps. A hole of small diameter is made in the box. Place an egg inside and examine it with slight turns in different directions.
How is the verification carried out?
Often eggs do not have visible external defects, but their internal pathology is possible. It is impossible to determine the quality of eggs without a special ovoscope device. The procedure performed using this device is called ovoscopy. Ovoscoping is the process of checking eggs before they are placed in an incubator or during incubation. It is carried out by shining a beam of directed light through the egg cavity, which allows you to see their contents.
How to choose eggs to lay and do you need an ovoscope?
Experienced poultry farmers know that in order to hatch healthy and active chicks, not only turkeys, but also other poultry, the quality of the material that will be placed in the incubator is very important
External signs
At the first stage, the eggs need to be sorted. First of all, they are carefully examined and specimens with problematic shells are rejected.
Learn how to choose high-quality eggs for incubation and how to wash eggs before placing them in the incubator.
Specimens that have the following on their outer covering are rejected:
- roughness;
- unevenness;
- growths;
- grooves.
Of course, chicks also hatch from such eggs, but the percentage of their hatching decreases, and the turkey poults themselves often have defects, since gas exchange is impaired in the wrong specimens.
In addition, you should also reject material with bluish or greenish spots (this is mold), as well as irregular shape: too elongated or too round, very large or, conversely, very small.
However, visual inspection cannot fully guarantee that the selected material can already be placed in the incubator. Therefore, it needs to be examined more carefully using an ovoscope.
Important! When breeding turkey poults in an incubator, experts advise choosing eggs of the same size.
We use an ovoscope
After a visual inspection, the eggs should be examined using an ovoscope in order to reject unsuitable material and in the future obtain healthy turkey offspring.
The candling process is simple: the incubation material is applied to the opening of the ovoscope or placed on a grid and turned in different directions. In this way, you can clearly see the air chamber, and the yolk is visible as a shadow with blurry boundaries.
Find out what an ovoscope is and how to properly ovoscope eggs, as well as how to make an ovoscope with your own hands.
When candling, first of all pay attention to the location of the yolk. In quality eggs suitable for incubation, the yolk is in the middle and surrounded by white on all sides
Along the vertical axis it is located closer to the blunt end.
If, during turning, the yolk slowly moves to the side and returns to its place at the same pace, then this means that the hailstones holding it suspended are intact. If at least one of them breaks, then after turning the yolk does not return back or freezes at one of the ends.
Such specimens are not suitable for incubation.
Did you know? The largest egg in the bird world is laid by the ostrich - with a diameter of 15–20 cm. The anti-record in this regard belongs to the hummingbird - 12 mm. The only hen that could compete with ostriches is the laying hen Harriet, who laid an egg with a diameter of 11.5 cm.
Specimens in which the yolk is close to the shell or in contact with it are also not used for breeding. Also unsuitable for incubation is material in which a rupture of the yolk membrane is noticeable, and the yolk itself is mixed with the protein.
Eggs with bloody spots, which can occur as a result of damage to the capillaries during egg formation, are also not of high quality.
Thus, during the initial ovoscoping, material is selected for placement in the incubator. In the future, the ovoscope will come in handy more than once during the incubation process itself.
How to tell the difference?
There are some signs by which you can recognize a fertilized egg:
- the diameter of the germinal disc is 3-3.5 mm;
- the outer part is opaque;
- the central one, on the contrary, is transparent, with a whitish spot;
- there is a small particle of blood in the yolk.
It is not difficult to enlighten a white egg, but the situation is more complicated with brown ones. Therefore, white eggs are often chosen to be placed in the incubator, since they are easier to check.
If a fertilized egg is illuminated, blood vessels will be visible. If there are no veins or black dots, this indicates a lack of fertilization, and such a specimen does not need to be placed in an incubator.
It also happens that in the yolk, when transilluminated, the clot is not visible, but the blood contour around the yolk is determined. Such a specimen is thrown away, since this indicates the death of the embryo inside. This happens for various reasons.
We carry out the procedure correctly or the subtleties of the operation
To properly carry out the ovoscopy procedure at home, you should follow several steps:
- place the device on a flat surface and start the workflow by pressing the “ON” button;
- place the egg in a suitable loophole and illuminate it (if the ovoscope model has the shape of a lantern, the egg must be held in the hand and rotated along the longitudinal axis).
An ovoscope is a special stand with a lamp that allows you to evenly illuminate the egg.
If you do not have an expensive apparatus, you can independently build a translucent device from scrap materials. A lighting mechanism is placed at the bottom of an ordinary cardboard box - for example, an incandescent lamp with a power of at least 100 watts. A small depression is formed at the top of the box, smaller than the size of the egg. An egg is placed in this opening and slowly turned in different directions, while the farmer examines its filling.
In a poultry farm, this operation is carried out somewhat differently. First, the eggs are brought to the hatchery on specialized transport, after which the containers are sent to the department, where the ovoscopic process takes place. Experts determine the homogeneity of the egg structure, study the location of the yolk and its mobility: in a high-quality sample, the yolk is located in the center with a shift towards the rounded end.
After carefully sorting the eggs, suitable specimens for incubation are placed on trays, disinfected and sent directly to the incubator for rearing.